|
Workspace 7.1.0
|
|
Workspace 7.1.0
|
This tutorial will walk you through the basics of creating a Workspace operation that utilises OpenCL to execute parallel code on devices including modern GPUs and many-core CPUs. By writing operations that use OpenCL in Workspace, users are able to do parallel processing on their supported GPUs and CPUs and also take full advantage of GPU clusters such as Bragg. These operations can further be combined with Workspace’s distributed execution to drastically reduce running time of workflows for particular tasks.
In this tutorial, you will learn:
This tutorial assumes you have already completed the following tutorials and are comfortable with the concepts they covered:
This tutorial also assumes you have a basic knowledge of OpenCL concepts. While this tutorial will start with the basics it is not intended as a user’s first introduction to OpenCL. There are many good online references, tutorials and books that serve this purpose.
User will need to have installed the OpenCL SDK for their target device(s).
The Workspace HPC plugin can be built against an OpenCL SDK which is available from various hardware vendors such as Intel, nVidia and AMD. The source code is available in the Workspace help examples folder (HPCPlugin) and can be built following the same steps as create a plugin. When configuring the project in CMake you should ensure the OPENCL_LIBRARIES entry is correctly pointing to your OpenCL SDK.
If you've built the plugin correctly and added it to Workspace's plugin loading list you should see something like "Adding Heterogeneous Parallel Computing version 3.3.0" in the log when Workspace starts. You should also have a "Heterogeneous Computing" section in the Workspace catalogue. Under this catalogue path you should be able to add and run the QueryOpenCLDevices operation which will list available devices in the log.
In this first tutorial we will develop a simple OpenCL operation that sums the elements from two lists of scalars (DataSeries). There is nothing special about this operation beyond what we do in its execute method. Therefore the first step is to follow what we've learnt in the previous development tutorials, using the Workspace wizards to create a plugin and then create an operation within that plugin to perform the OpenCL work.
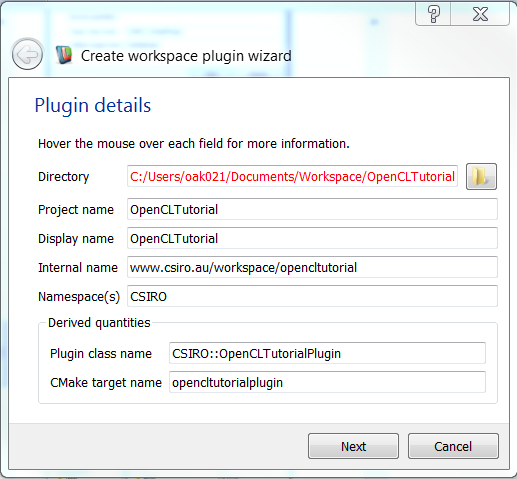
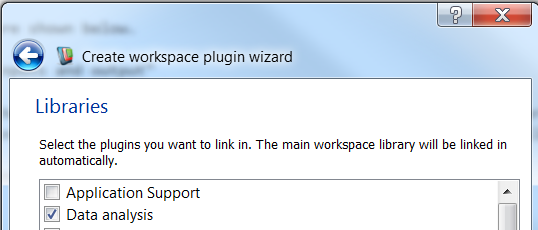
You should add the Data analysis and Heterogeneous Parallel Computing libraries during plugin creation
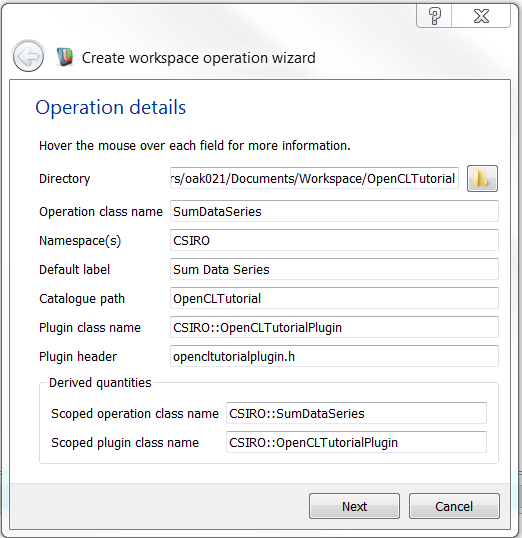
We will call this operation SumDataSeries
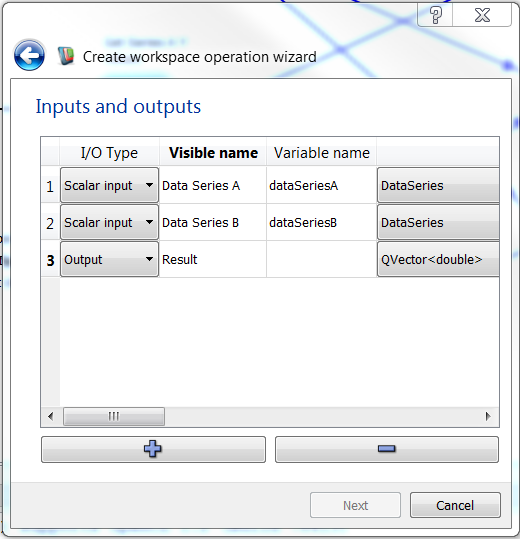
The inputs and outputs needed when using the operation wizard are shown below.
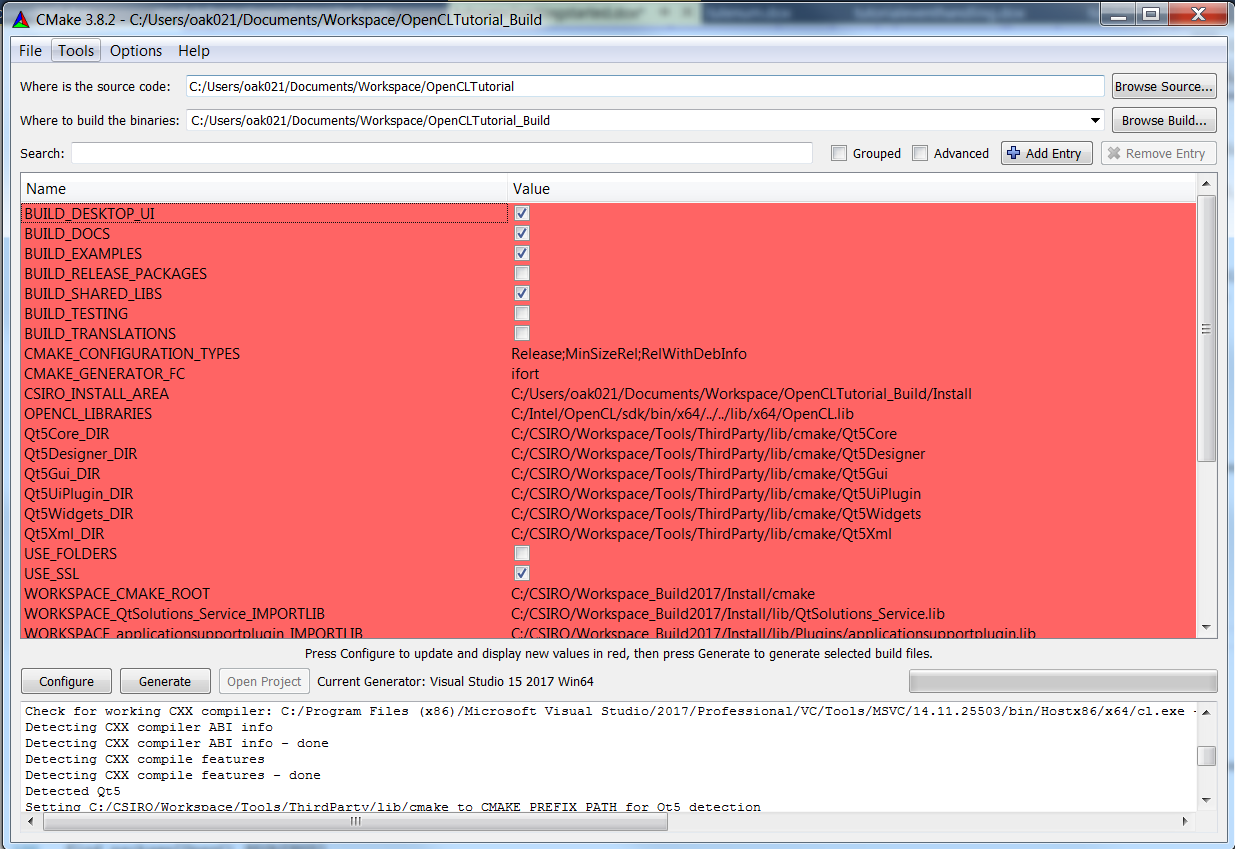
Beyond the code we write in the operation’s execute function, there is another small change required to allow OpenCL support. Your plugin will require an OpenCL SDK to compile and link against so we must add this dependency in the CMakeLists.txt file of your plugin.
In your CMakeLists.txt file add the following lines after the set(QT_LIBRARIES Qt5::Core;Qt5::Widgets) line
If you didn't add libraries in during plugin creation, you will need to add the heterogeneousparallelcomputingplugin plugin to the target_link_library list. Since we are also using DataSeries in this tutorial you should also ensure dataanalysisplugin is in the list and OPENCL_LIBRARIES included as shown below.
Once you have made these changes you should be able to run CMake on your plugin which will find the OpenCL headers and libraries on your system.
Using what you’ve learnt in the previous development tutorials you should be able to reach a point where you can compile and load your new operation (which won’t do anything) in Workspace.
The remainder of this tutorial will focus on using OpenCL in your operation's execute() method. Before we’re able to do anything interesting we’ll need to include the following header near the top of the operation’s .cpp file
We'll also add a using directive so we don’t have to prefix everything with CSIRO, CSIRO::DataAnalysis or CSIRO::HPC
The first thing we’re going to do is use our operation to list all the available devices on the system. All the Workspace support classes for working with OpenCL live in the CSIRO::HPC (Heterogeneous Parallel Computing) namespace. To get a description of each device available on the system we’re going to use the HPCDeviceManager singleton class. The code below shows how to query the description of each device on the system.
The DeviceInfo structure also contains other members such as the device type (eg. CL_DEVICE_TYPE_GPU) and the device capabilities which you may find useful. This structure also contains platformId and deviceIdforPlatform which you can use directly with the OpenCL API if you wish to do things beyond those exposed via the HPCDeviceManager.
You should now be able to compile and execute your new operation to produce information in the Workspace log similar to this.
We’re now going to use a CSIRO::HPC::ScopedDeviceAcquisition object to acquire and release the device we want to execute our code on. We use this object for all our interaction with OpenCL, rather than doing it directly with the OpenCL API. This allows Workspace to coordinate access to the available device(s) between operations that may be running in parallel. The code below shows how we acquire the next available GPU device. When the ScopedDeviceAcquisition object goes out of scope it will automatically release the device for other operations to use.
Many OpenCL devices do not support doubles which is the default type of scalars used by Workspace and its DataSeries type. DataSeries is also an abstract interface to a series of scalars so the values may not exist as a contiguous buffer of data in memory. For these reasons the first step is to convert the DataSeries inputs into two buffers of floats which can be uploaded to the GPU.
Now that the input data is in a format suitable for upload to the device we need to allocate the buffers on the device for our two inputs and one output buffer. For the input buffers we use the CL_MEM_READ_ONLY flag and for the output buffer we use the CL_MEM_WRITE_ONLY flag to help OpenCL use the best memory for these buffers. The cl::Buffer object also takes a pointer to the source data on the host (eg. &hostBufferA[0]) and the size of that data (inputSize * sizeof(cl_float)).
Note the use of checkOpenCLResult() to check for any errors. This and getOpenCLErrorString() are defined in hpcdevicemanager.h
The kernel is the code that will execute on the device in parallel. In this tutorial we will define the kernel using a string within the operation. This kernel is going to run on the device for each element in the input arrays. OpenCL’s kernel language is based on a subset of C99 and the kernel itself is just like a C function. In this simple example our kernel is called vadd (vector add) and take three arguments, the two input arrays and one output array of floats. It then uses OpenCL’s built-in get_global_id() function to get the index of the current work item (out of all the work items that are executing in parallel). The code below shows the kernel being defined, compiled and having its arguments set ready for execution.
We’re now ready to execute the kernel which is done using enqueueNDRangeKernel on the command queue as shown below
We use enqueueMapBuffer() on the command queue to map the output buffer used by the kernel back to a pointer that we can access on the host. We’ve passed CL_TRUE as the blocking parameter for this call so that the method will only return once the kernel has finished executing and the results are ready. We can then use the pointer returned from this call to populate the output DataSeries.
Finally we need to unmap the output buffer as shown below. All other resources (such as the device buffers and kernel object) are automatically released because we’re using the OpenCL C++ Wrapper API. If using the straight C API a number of release calls need to be made manually.
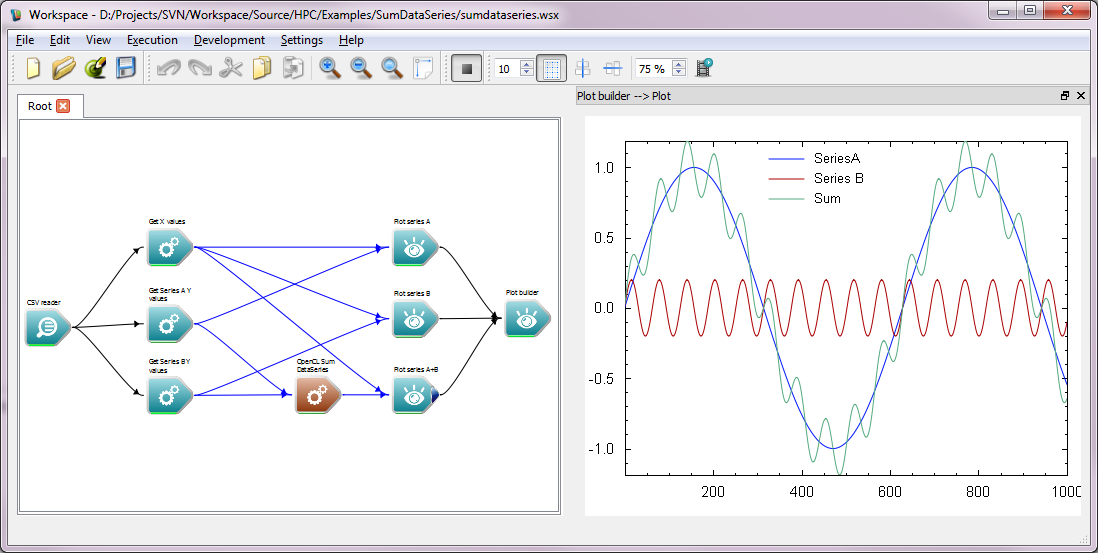
Assuming your operation compiles correctly you should be able to combine this with a CSV reader and Plot builder operation to read some sample data and test your new operation as shown below. This workflow (using the sample operation provided with the Workspace HPC plugin) is available here.
That concludes the tutorial. We have now learned:
The next tutorial provides a more advanced example of using OpenCL in Workspace: