Workspace 6.21.5
More OpenCL

Introduction

This OpenCL tutorial will step through a slightly more complicated example that populates an image using a Julia set fractal (http://mathworld.wolfram.com/JuliaSet.html). This time we'll show how to use an OpenCL kernel defined in a file, allowing modifications to be made without needing to recompile your plugin.

In this tutorial, you will learn:

  • How to create an operation that uses OpenCL but can fall-back to a non-OpenCL implementation if required
  • How to create an operation that uses an OpenCL kernel defined in a file

Prerequisites

This tutorial assumes you have successfully completed the first OpenCL tutorial Getting Started with OpenCL in Workspace.


Setting up a new operation

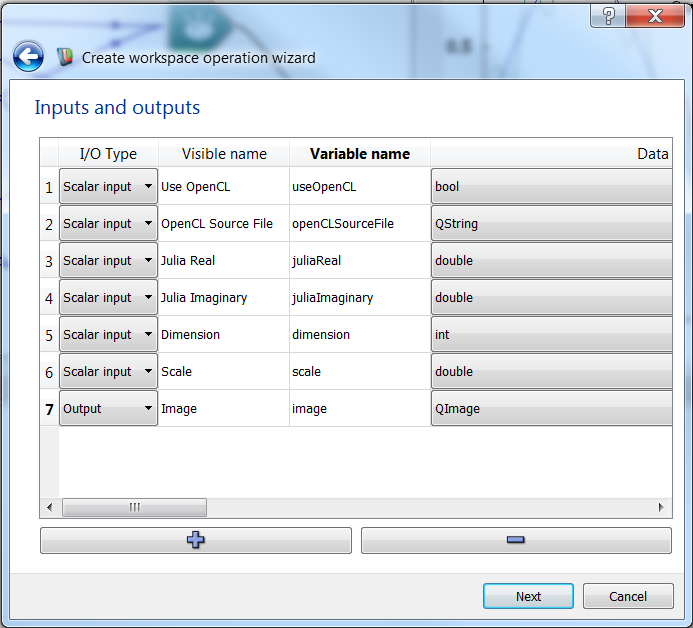
As with the first tutorial, the first step is to create our new operation. We will call this operation "OpenCLJuliaSet" and its inputs and outputs needed when using the operation wizard are shown below. It is assumed this operation is being added to the plugin used in the first tutorial meaning the necessary OpenCL dependencies have already been taken care of in your plugins CMakeLists.txt

Creating a new operation with the Workspace wizard

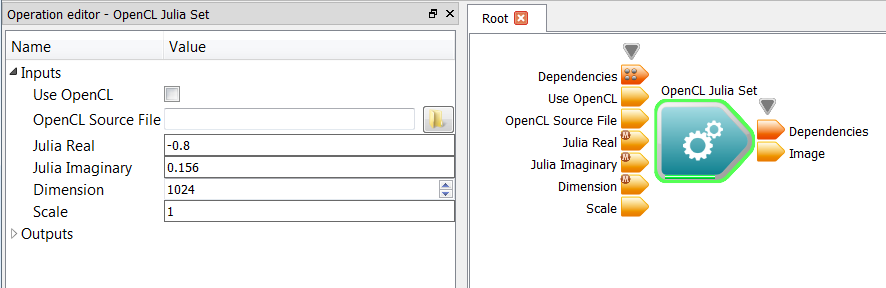
We will explain each of the inputs and outputs as we use them throughout the tutorial. With the basic operation created by the wizard we can now add the exciting stuff into the execute() method. In this tutorial we are going to create an operation that can run in both OpenCL and non-OpenCL mode, allowing us to compare the two methods. To start with we shall look at the traditional (non-OpenCL) implementation.

Complex Numbers

Our Julia set uses complex numbers so the first thing we need to do is define a struct to represent complex numbers. If complex numbers were going to be used by multiple operations this struct would be a prime candidate for turning into a new Workspace data type. For simplicity in this tutorial we'll simply define it as a local class at the top of the operation's cpp file.

struct ComplexNumber
{
double r;
double i;
ComplexNumber( float real, float imaginary ) : r(real), i(imaginary)
{}
double magnitude2()
{
return r*r + i*i;
}
ComplexNumber operator* (const ComplexNumber& other)
{
return ComplexNumber(r*other.r - i*other.i, i*other.r + r*other.i);
}
ComplexNumber operator+ (const ComplexNumber& other)
{
return ComplexNumber(r+other.r, i+other.i);
}
};
DataSeries::const_iterator operator+(DataSeries::const_iterator::difference_type n, const DataSeries::const_iterator &it)
Definition: dataseries.h:212
OctreeVector3< ScalarType > operator*(const OctreeVector3< ScalarType > &a, ScalarType b)
Definition: octree.h:101
double i
Definition: opencljuliaset.cpp:45
double r
Definition: opencljuliaset.cpp:44

Evaluating the Julia Set

At the start and end of our operation’s execute() method we’re going to add the following QTime code. This will allow us to track and trace how long our operation takes to execute so we can compare our OpenCL and non-OpenCL implementations at various output image sizes. The start of our execute method will also assign a new QImage of the correct size into our output so it’s ready to be populated. We use the dimension_ input as the size of the output image.

bool OpenCLJuliaSetImpl::execute()
{
const int& dimension = *dimension_;
QImage& image = *image_;
QTime executeTime;
executeTime.start();
// Assign new image of the correct size ready to be populated
image = QImage(dimension, dimension, QImage::Format_RGB32);
// Julia set will be calculated here
logLine(LOG_INFO,tr("Julia set calculated in %2s").arg(double(executeTime.elapsed())/1000));
return true;
}
QImage
Definition: image.cpp:66
const Application::LogManager::MessageCategory LOG_INFO("Info", true)
Definition: logmanager.h:211

The pattern of the Julia set is determined by a complex number we’re calling juliaConstant. The value of this complex number is an input into the operation so users can modify it at runtime. To default to an interesting pattern we'll set the default values for dataJuliaReal_ and dataJuliaImaginary_ in our operation’s constructor as shown below. We'll also set a default size for the output image dimension.

OpenCLJuliaSetImpl::OpenCLJuliaSetImpl(OpenCLJuliaSet& op) :
...
juliaReal_("Julia Real", op_, -0.8),
juliaImaginary_("Julia Imaginary", op_, 0.156),
dimension_("Dimension", op_, 1024),
...
{}

We evaluate the value of the Julia set for each pixel of the output image using the code below in our execute() function

bool OpenCLJuliaSetImpl::execute()
{
const bool& useOpenCL = *useOpenCL_;
const QString& openCLSourceFile = *openCLSourceFile_;
const double& juliaReal = *juliaReal_;
const double& juliaImaginary = *juliaImaginary_;
const int& dimension = *dimension_;
const double& scale = *scale_;
QImage& image = *image_;
// ...
int halfSize = dimension / 2;
const ComplexNumber juliaConstant = ComplexNumber(juliaReal, juliaImaginary);
// Step through each pixel in the output image and evaluate 0 or 1 for the Julia set
for (int x=0; x<dimension; ++x)
{
for (int y=0; y<dimension; ++y)
{
int julia = 1;
double jx = scale * double(halfSize-x) / halfSize;
double jy = scale * double(halfSize-y) / halfSize;
ComplexNumber a(jx, jy);
for (int i=0; i<200; ++i)
{
a = a * a + juliaConstant;
if (a.magnitude2() > 1000)
{
julia = 0;
break;
}
}
image.setPixel(x, y, qRgb(0, 200*julia, 50*julia));
}
}
// ...
}
unsigned char x
Definition: wsgloctreeshaderimplementation.cpp:81
unsigned char y
Definition: wsgloctreeshaderimplementation.cpp:82

At this point you should be able to compile and run your operation. Drag your new OpenClJulaSet operation onto a blank Workspace canvas, click on the Image output and select Display with ImageWidget. Initialise its values using the Operation editor if they aren't there by default.

Suggested input values for the OpenCLJuliaSet operation

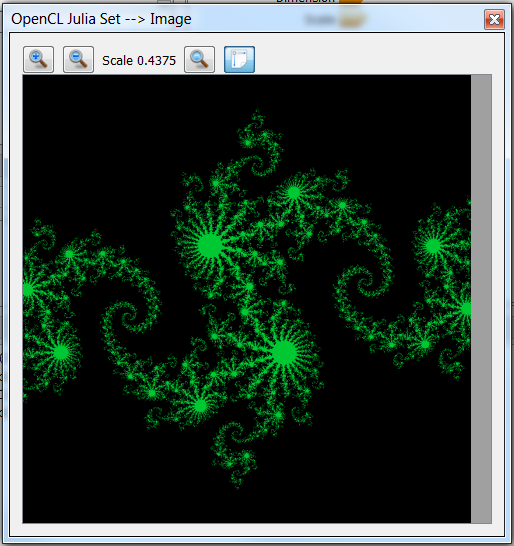
Run the workflow to produce an image like the one below. You should also see the timing output we added in the log window - Julia set calculated in 0.281s. By increasing the Dimension input you can see that the operation takes longer to run since there are more pixels to calculate.

Output image from our Julia set operation

Evaluating the Julia Set using OpenCL

Now we're going to extend our operation to calculate the same image using OpenCL. We will use the Use OpenCL input on the operation to control which method we use (OpenCL or non-OpenCL) allowing the user to compare the timing. First lets setup our execute() method to use this conditional.

bool OpenCLJuliaSetImpl::execute()
{
const bool& useOpenCL = *useOpenCL_;
// ...
QTime executeTime;
executeTime.start();
// Assign new image of the correct size ready to be populated
image = QImage(dimension, dimension, QImage::Format_RGB32);
if (useOpenCL && !HPCDeviceManager::getInstance().getDevices().isEmpty())
{
// Our new OpenCL version will go here
}
else // Standard non-OpenCL C++ method
{
if (useOpenCL)
{
logLine(LOG_ERROR, tr("No OpenCL devices found, falling back to non-OpenCL implementation"));
}
// Our existing evaluation code goes in here
// ...
}
logLine(LOG_INFO,tr("Julia set calculated in %2s").arg(double(executeTime.elapsed())/1000));
return true;
}
static HPCDeviceManager & getInstance()
Definition: hpcdevicemanager.cpp:480
const Application::LogManager::MessageCategory LOG_ERROR("Error", true, "ERROR: ")
Definition: logmanager.h:215

At this point we're ready to implement our OpenCL version of the Julia set calculation.

Step 1: Acquiring an OpenCL Device for Execution

As with the first tutorial, the first step is to check there is at least one OpenCL device available on the system and to acquire the first available one.

// Acquire an OpenCL device
ScopedDeviceAcquisition openCLdevice;
if (!openCLdevice.isValid())
return false;
logLine(LOG_INFO,tr("Calculating Julia set with device %1: %2").arg(
openCLdevice.getDeviceInfo().deviceId_).arg(
openCLdevice.getDeviceInfo().description_));

Step 2: Allocate Device Buffers

This calculation does not require any input buffers so we only need to allocate a buffer to write the output image into. OpenCL supports the concept of image buffers which we could use in this example (cl::Image2D and cl::Image3D). Since we're only calculating true or false for each pixel, don't need any filtering and don't want to directly inter-op with OpenGL, we'll stick with standard cl::Buffer for simplicity. For the output buffer we use the CL_MEM_WRITE_ONLY flag to help OpenCL use the best memory.

unsigned bufferSize = dimension * dimension;
cl_int errorCode = 0;
// Create the memory to be used by the kernel on the device
cl::Buffer deviceBuffer(openCLdevice.getContext(),
CL_MEM_WRITE_ONLY,
bufferSize * sizeof(cl_char),
0,
&errorCode);
if (!checkOpenCLResult(errorCode, "Failed to allocate deviceBuffer"))
return false;
bool checkOpenCLResult(cl_int errorCode, const QString &errorMsg)
Definition: hpcdevicemanager.cpp:737

Note the use of checkOpenCLResult() to check for any errors. This and getOpenCLErrorString() are defined in hpcdevicemanager.h

Step 3: The Device Kernel

In the first OpenCL tutorial we defined the kernel as a string inside the operation. This means our operation needs to be recompiled whenever we wanted to change the kernel. Another option is take a file name as an input to the operation and load the kernel from file. This means the kernel can be changed at runtime without recompiling your plugin (as long as the host code stays the same). In this example we're going to define the kernel in a file called julisset.cl and pass that to the operation as an input. Before we look at the host code in our operation, lets look at the OpenCL kernel in juliaset.cl

\\ juliaset.cl
typedef struct
{
float r;
float i;
} ComplexNumber;
float complex_magnitude2(ComplexNumber a)
{
return (a.r*a.r) + (a.i*a.i);
}
ComplexNumber complex_add(ComplexNumber a, ComplexNumber b)
{
ComplexNumber result;
result.r = a.r+b.r;
result.i = a.i+b.i;
return result;
}
ComplexNumber complex_multiply(ComplexNumber a, ComplexNumber b)
{
ComplexNumber result;
result.r = (a.r*b.r) - (a.i*b.i);
result.i = (a.i*b.r) + (a.r*b.i);
return result;
}
__kernel void juliaSet(__global char* result, const float scale, const int width)
{
size_t id = get_global_id(0);
size_t y = id / width;
size_t x = id % width;
int halfWidth = width / 2;
float jx = scale * ((float)halfWidth-x) / halfWidth;
float jy = scale * ((float)halfWidth-y) / halfWidth;
ComplexNumber c = {-0.8, 0.156}; // makes for a pretty picture
ComplexNumber a = {jx, jy};
for (int i=0; i<200; ++i)
{
a = complex_add(complex_multiply(a,a), c);
if (complex_magnitude2(a) > 1000)
{
result[id] = 0;
return;
}
}
result[id] = 1;
}
LodMeshModelInterface::size_type id
Definition: lodmeshmodelinterface.cpp:53
const QString width("width")

With the kernel defined in our source file, lets look at the code we need in our operation to use it.

// Could also use "-DWIDTH=%1 -DSCALE=%2" as an option to buildProgramFromFile()
// but this requires a rebuild of the source each execute which can be slow
cl_float scaleForKernel = scale;
cl_int widthForKernel = dimension;
// Compile the kernel
cl::Program program;
if (!openCLdevice.buildProgramFromFile(openCLSourceFile, program))
{
return false;
}
// Set the kernel arguments
cl::Kernel kernel(program, "juliaSet", &errorCode);
if (!checkOpenCLResult(errorCode, "Failed to load juliaSet kernel"))
return false;
errorCode |= kernel.setArg(0, deviceBuffer);
errorCode |= kernel.setArg<cl_float>(1, scaleForKernel);
errorCode |= kernel.setArg<cl_int>(2, widthForKernel);
if (!checkOpenCLResult(errorCode, "Failed to set juliaSet kernel arguments"))
return false;

You'll notice it's very similar to what we used in the first OpenCL tutorial. The difference being we use openCLdevice.buildProgramFromFile() with the openCLSourceFileName passed in as an input. Workspace will cache a copy of the compiled kernel for the given device. This means it will only need to recompile the kernel if the file time stamp changes or you're using a different device for any subsequent executes of your operation.

Step 4: Executing the kernel

We’re now ready to execute the kernel which is done using enqueueNDRangeKernel on the command queue as shown below.

cl::CommandQueue& commandQueue = openCLdevice.getCommandQueue();
// Queue the kernel to run
errorCode = commandQueue.enqueueNDRangeKernel(
kernel,
cl::NullRange,
cl::NDRange(bufferSize),
cl::NullRange);
if (!checkOpenCLResult(errorCode, "Failed to enqueueNDRangeKernel"))
return false;

Step 5: Reading the results back from the device

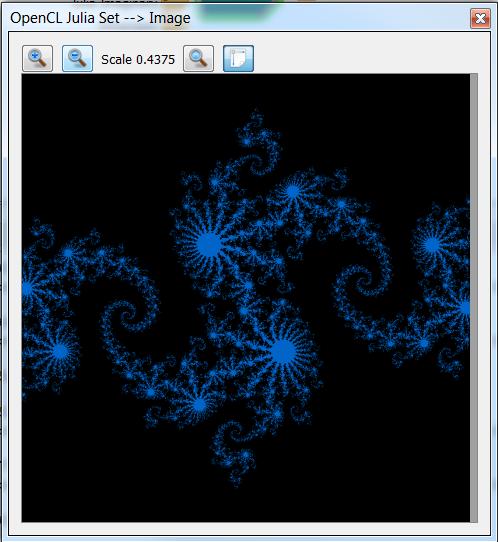
As with the first tutorial, we use enqueueMapBuffer() on the command queue to map the output buffer used by the kernel back to a pointer that we can access on the host. We’ve passed CL_TRUE as the blocking parameter for this call so that the method will only return once the kernel has finished executing and the results are ready. We can then use the pointer returned from this call to populate the output QImage. We use a different color for this image, qRgb(0,100,200), to highlight that this image was created with OpenCL.

// Read back the results - blocking
cl_char* output = static_cast<cl_char*>(commandQueue.enqueueMapBuffer(
deviceBuffer,
CL_TRUE, // block
CL_MAP_READ,
0,
bufferSize * sizeof(cl_char), 0, 0, &errorCode));
if (!checkOpenCLResult(errorCode, "Failed to enqueueMapBuffer"))
return false;
for (int x=0; x<dimension; ++x)
{
for (int y=0; y<dimension; ++y)
{
int julia = output[x+(y*dimension)];
image.setPixel(x, y, qRgb(0, 100*julia, 200*julia));
}
}

Step 6: Releasing resources

Finally we need to unmap the output buffer as shown below. All other resources (such as the device buffers and kernel object) are automatically released because we’re using the OpenCL C++ Wrapper API. If using the straight C API a number of release calls need to be made manually.

// Release the output buffer
errorCode = commandQueue.enqueueUnmapMemObject(
deviceBuffer,
(void*)output);
if (!checkOpenCLResult(errorCode, "Failed to enqueueUnmapMemObject"))
return false;

Summary

You should now be able to compile your operation and test out the performance improvement from your OpenCL implementation of the Julia set calculation. You should be able to toggle the "Use OpenCL" input on the operation and see the image change from green to blue depending on the method used. As you increase the "Scale" input you should be able to see the vast improvement in execute time the OpenCL version has over the traditional C++ version in the log window.

Julia set calculated in 1.104s //<- Traditional C++
Calculating Julia set with device 0: Intel(R) Corporation Intel(R) Core(TM) i7-3770 CPU @ 3.40GHz (CPU) supports OpenCL 1.2 (Build 63463)
Julia set calculated in 0.139s //<- OpenCL
Output image from our OpenCL Julia set operation

That concludes the tutorial. We have now learned:

  • How to create an operation that uses OpenCL but can fall-back to a non-OpenCL implementation if required
  • How to create an operation that uses an OpenCL kernel defined in a file

Next Steps

For further references and tutorials on OpenCL check out Khronos Group OpenCL Resources