|
Workspace 7.1.0
|
|
Workspace 7.1.0
|
There is no suggested pre-reading for this tutorial, but a basic knowledge of programming in C is assumed. You should have a working knowledge of what a struct is, know how to use pointers and be familiar with writing and calling a function in C. At the end of this tutorial, a few highly recommended references are listed for further study.
If you are already comfortable with C++, you can skip this tutorial and move straight on to Writing a Simple Workspace Plugin.
Writing plugins for Workspace requires a basic understanding of a relatively small amount of C++. By using the other tutorials as examples, much of what you want to do can be achieved by taking tutorial example files and modifying them. To better understand what the code means, however, a little grounding in C++ might be useful.
This tutorial aims to teach you the key features of C++ as used by the Workspace framework. You only need a very basic understanding of C to follow this tutorial, and only the essential C++ features used by the simple tutorials will be presented. By the end of this tutorial, you should be able to understand all code examples used in the simple tutorials.
A struct in C is a way of grouping together some variables so that they can be more easily managed. A struct can be passed as a single parameter to a function, its members can be accessed individually and it can have any level of nesting by including other structs as its members. A simple example of a struct holding two integers would look like the following:
In C++, the concept of a struct is extended further by allowing the structure to hold not only variables, but also functions which have a special relationship to those variables. In C++, we call this a class. An example of a simple class similar to the above struct follows:
The first thing to note is that we replaced struct with class. The two integer variables are then listed exactly as before as the first entries. The word public followed by a colon indicates that what follows can be accessed by any client code. We won't talk too much about this just yet, other than to say that by default, the contents of a class can only be accessed by functions that are part of the class. We will come back to this a bit later.
After public: we have the name of the class again, but here it is followed by a colon, the two variable names with arguments and some curly braces. This looks somewhat like a function call but without a return type and with some extra things inserted between the function name and the function body. In fact, this is a function, but it is a special type of function called a constructor. A class' constructor is called whenever an object of this type is created. The compiler uses it to initialize the object so that its initial state is well defined. Your job is to write a constructor that sets the value of each of the class' variables to a defined value, and this is what the above constructor code between the function name and the function body does. Specifically, after the colon, you should include each of the class' variables in the same order as they appear in the class itself. For each variable, include a value for it as shown in the example.
A constructor is not required to assign values to every class variable, but for the simple class examples we will be using in the tutorials, it is advisable. If you omit a variable from the constructor's initialization list, the compiler uses a default constructor for that variable. For built in types such as int, double, char and so on, their default constructor actually leaves the variable with an undefined value, hence why you should specifically set it for these types.
Indeed, you can define your class without a constructor too if you want. If your class has no constructor defined, the compiler will automatically provide one for you. But if your class has variables of built in types (int, double and so on), this will normally not be what you want because those variables will start with undefined values. In fact, this is exactly the behavior of a struct in C.
We will come back to the topic of constructors a bit later, but let us now return to the public: keyword again. As mentioned previously, by default all items in a class can only be accessed by functions that are part of the class. We call this level of access private, since it means those items are private to the class itself and they cannot be accessed by anything outside of that class. To be clearer about this, we can add the private: keyword to the code example earlier to be explicit about the level of access to the variables:
But this highlights a problem with this class. Since value1 and value2 are both private, nothing outside of the class can access them directly. The only public part of the class is the constructor, but that only allows us to create a MyClass object and not to access value1 or value2. We need to add some functions to the class so that we can access the two variables:
Here we have added four functions to the class, and we call them member functions. These functions are in the public section, so anyone can call them. By their names, we can see that these functions allow us to set and get the values of the two variables. This is better style than accessing the variables directly, since it allows us to modify the class details later without having to modify all the code that uses the class (eg we could modify setValue1() to record every time value1 was modified in addition to setting its value).
The getValue1() and getValue2() have the word const after their parameters but before their function body. This indicates that the function is not permitted to modify any of the member variables or call any other member function of this class that does not also have the word const in this location. It essentially says "this function cannot
modify this object".
So how do you actually call these member functions? You call them by prepending the function name with the name of an object and using a dot just like you would if you were accessing a member variable of a struct. For example:
The first thing to note is how we created mine at (1). This is just like how we would declare any other variable, but the compiler will automatically call the MyClass constructor for us to initialize the object. But we can do something more interesting with constructors. We can give them parameters so that client code has greater control over how the object is constructed. For example:
Now we could specify what initial values we wanted to give to our MyClass object like so:
As you can see, a member function is very similar to an ordinary function, but you may be wondering how the member functions can access the value1 and value2 variables when those variables are not passed as parameters. This is the main area of distinction of a member function: they have full access to all of the class' variables without having to pass them as parameters. When you call an object's member function, the function acts on that object's member variables.
There are two other types of functions you may encounter inside a class. We present next an example containing these two extra types of functions:
At (1), we see another function that appears very similar to the other functions except it has the word static in front of it. This has two effects:
MyClass object to call it with.In fact, a static function is exactly the same as an ordinary function like what you would have in C, except it is defined inside a class and is subject to the public/private access restrictions of that class. You would call a static function by prepending the name of the class followed by two colons instead of prepending an object of type MyClass. For example:
The MyClass:: part has the effect of saying to the compiler "Look in \c MyClass for the
thing that follows the \c :: ". We call this scoping, since you are telling the compiler what scope of the code to look in. We will talk more about scoping later with some concrete examples.
The other type of function at (2) has the word virtual in front of it. This can be called just like an ordinary member function, but it has special behavior when used with class inheritance (which we will talk about in another section further below).
mine.setValue1(23) MyClass::computeSum(8, 11).
Normally, the definition of a class is separated from its implementation. This allows client code to include a header file containing the class definition, but allow the implementation to be put in another file. Whenever the implementation file is changed, the other files that depend on the class definition do not have to be recompiled. This is the usual way C++ source code is structured, but ultimately it is a matter of personal choice.
An example of how to separate the class definition from its implementation is now shown for the previous example. First, a header file called myclass.h might have the following contents:
All the function bodies have been removed, but the rest of the class stays the same. An implementation file called myclass.cpp would then look something like this:
In the separate implementation file, the functions all have the name of the class and a pair of colons before the function name. In other words, all the function names are scoped. That's about all that is different though.
In very large projects, it is conceivable that two different people might use the same name for their own classes. The compiler will complain about that and fail. In order to help this situation, C++ offers a feature called namespaces. These act like containers for holding other C++ things and serve to group functionality under some kind of logical umbrella. You can nest namespaces, but it is uncommon to see this done for more than 2-3 levels.
Namespaces are most easily explained by example. Let us see what it looks like when we put our class inside some namespaces:
We have put our MyClass inside MyNamespace, which is itself inside the CSIRO namespace. If someone else had defined a class called MyClass but it was in a different namespace, the compiler would have no difficulty telling them apart. Implementing the class is also equally as straightforward:
If we now wanted to use this class in a program, we would do something like the following:
Here we can see the scoping feature being used again. In order to refer to MyClass, we now have to use the full scope to tell the compiler where to find it. A useful analogy is that of telephone numbers. If you are calling internationally, you need to include a country code, then an area code and finally the number in the country you are calling. If you are already in the same country, you only need the area code and the number, and if you are in the same region, you just need the number and can omit the country and area codes. For our above example, the following should help illustrate this concept:
In just about all Workspace code, two levels of namespaces are used. The outer namespace is always CSIRO. The second level namespace usually indicates either some conceptual layer of functionality or else it refers to a particular module (ie a separate Workspace plugin). You are encouraged to follow this pattern and use CSIRO as your outer namespace and use a second level namespace name that reflects what your group of code does.
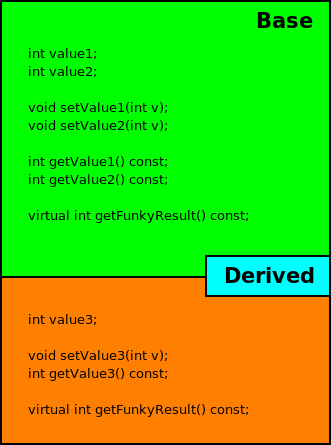
A class is far more powerful, however, than just a struct with some functions and access control. Classes also support a concept called inheritance where a class can be extended by providing additional functionality, such as adding more variables and functions. One way to think of inheritance is to picture the class being extended (which we call the base class) as a block. The extra bits being added by the extending class (which we call the derived class or subclass) are joined to the bottom of the block. Where this becomes very useful is that anywhere in your code that you need to use a Base object, you can also use a Derived object without any change to your code. You can create a pointer to type Base from an object of type Derived and treat it exactly like a Base object. You are essentially creating a pointer to the Base part of the block and not worrying about the block tacked onto the bottom for the Derived portion. We will see a bit later where this can be exploited for some very powerful techniques, but for now, let's see what this looks like in diagram form and in code:
Looking now at the above code example, the Base class is essentially the same as the MyClass definition we have been working with so far. Following that, we have the definition of another class called Derived. The first line of this definition specifies the relationship between Derived and Base :
This says that the Derived class is an extension of the Base class. The other important thing to note in the Derived class is how its constructor is written:
The first entry in the initialization list is actually a call to the constructor of the base class. The purpose of this is to allow the base class to initialize itself and this must happen before any of the derived class' variables are initialized. After that, we only need to initialize the variables added by the derived class.
It should also be noted that there is a function called getFunkyResult() in both the base class and the derived class, and it has been marked with the virtual keyword. The effect of this is that any call to getFunkyResult() will call the function in the derived class, even if the call is made through a pointer to the base class type. An example should help clarify this:
At (1), we see that a Base* pointer can be created to point to what is actually a Derived object. The compiler applies the conversion between types for you automatically. The bPtr can then be used as though it pointed to a Base object (2), but not as though it pointed to a Derived object (3).
At (4), we call getFunkyResult() on a Base object. This will obviously call the base class version of the function (ie Base::getFunkyResult() ). At (5), we call getFunkyResult() on a Derived object, which calls the derived class version of the function (ie Derived::getFunkyResult() ) and ignores the base class implementation of that function. Derived::getFunkyResult() is said to override Base::getFunkyResult().
But the whole purpose of the virtual keyword is made evident by the code at (6). At this line, we see getFunkyResult() being called through a pointer to a Base* object. What this does, however, is ultimately call Derived::getFunkyResult(). The virtual keyword has the effect of marshalling the function call to the implementation defined in the subclass, even when the function is called through a base class object such as a pointer to Base*. This allows you to write your code as though it were operating on Base* pointers but have behavior customized by subclasses to do different things for different subclass types. For example:
In the above code, the obtainValue() function only needs to be written once and take a Base* parameter, yet it is able to invoke the specialized getValue() implementation of the object passed to it thanks to getValue() being a virtual function.
In C, when you want to pass an object to a function and allow that function to modify it, the usual practice is to pass a pointer to the object. Sometimes you want to pass an object to avoid having to copy it, but you don't want to allow the function to change it. The following examples illustrate this:
One of the drawbacks, however, is that when passing a pointer, there is the chance that the caller didn't supply a pointer to something valid. In fact, the caller might be passing a null pointer. To be robust, the function then has to always check if the argument is null before using it. In C++, there is an alternative to pointers which offer the same capabilities but without the null pointer issue. This feature is called a reference and it is marked by the presence of an ampersand (&) character. The equivalent of the previous code example using references is as follows:
As you can see, we have simply replaced the asterisk with an ampersand and the -> becomes a simple period (.) character. You can think of a reference as allowing you to syntactically treat the variable as though it were a local variable, but it refers to another object just like a non-null pointer does. C++ specifically states that it is illegal for a reference to be created without it referring to something valid, so you do not have the equivalent of a null pointer issue when using references. This is one of the main reasons for using references.
A more complete example will illustrate how references look when passing objects between functions. We use the Base and Derived class examples used earlier in this tutorial:
The first thing to note is that when passing a variable to a function that expects reference parameters, you do not need to prepend an ampersand like you would if the parameter was a pointer. You simply put the variable name just as you would if you were passing the variable by value. Thus, at (1) both b1 and b2 are passed by reference and b2 is modified by the call.
The second thing to note is that you can pass a derived class where a reference to a base class is expected, as (2) and (3) show. The compiler automatically applies the relevant logic to allow the function to accept the derived class as a base object. This is exactly like what occurs for pointers. This is particularly useful when virtual functions are involved, as is the case for (3).
As long as you understand (1), (2) and (3), this should be enough to understand what you need to know about references in order to write a Workspace plugin. There are a few more useful things to know about references, but it is not necessary to know about these to follow the simple tutorials. Consult a good book on C++ to learn more about references, how else to use them and what restrictions they have.
While not needed for the tutorials, the code at (4) shows how you can also use references even within a function. This can be a useful way to create shorthand for something, usually something with a longer name or that consists of pointers to class members or similar. The compiler will usually optimize away the reference anyway, so the performance should be just the same as if you wrote the full name of what the reference was referring to.
You will sometimes encounter a situation where you have a function name which says exactly what the function does and which takes a certain set of parameters. You then want to add another function which does the same thing but which takes a different set of parameters. In C, you have no choice but to use different names for the two functions. In C++, however, you can re-use the same name as long as the function parameters are somehow different between the two functions. You can have a different number of parameters, or you can have parameters where at least one of them has a different type to the corresponding parameter in the other function. This is called function overloading. The return type of the function is irrelevant to overloading. You cannot have two functions which differ only by their return type.
Any type of function can be overloaded, including class constructors. Consider the following example code:
In the above, functions (1), (2) and (3) all have either a different number of parameters or the type of their parameter(s) are different to all the other functions. At (4), the return type is different, but that is irrelevant. Because there is only one int parameter and this is already declared at (1), the line at (4) would be deemed an error by the compiler. The example class shows how two different constructors can be specified just like any other function. We could also do this for class member functions, static functions and virtual functions.
Function overloading is used in some parts of Workspace. It would be quite common to encounter it in Workspace plugin code as well. All you really need to understand is that you must ensure the parameter combinations are somehow unique for each function overload. The compiler will always tell you if you get it wrong. In some cases, the compiler might complain that it cannot tell which function you want to call in certain scenarios. This is usually easy to address by ensuring that the parameters passed to the function are of exactly the types expected rather than relying on automatic conversions such as an int being converted to a double.
For the curious, function overloading opens up a whole range of very useful techniques, particularly with some of the more advanced aspects of C++ such as templates and operators. You should be able to avoid these in the tutorials and when writing a simple Workspace plugin. Overloading is mentioned here mostly just so that if you encounter it in some of the code you use, you will at least have some idea what it means.
The last thing we will talk about in any depth for this tutorial is something that isn't specific to C++, but which is perhaps more frequently encountered in C++ code than in C. This technique involves adding a few lines of preprocessor directives to ensure that header files only ever get included once by a compiler when it processes implementation files that pull in multiple headers. These macros are often called header guards and take the following form:
The first two lines of the above example should be the first two lines of your header file and the last #endif line should be at the end of the file. These together ensure that the contents of the file are skipped after the compiler has already seen them once before. The CSIRO_MYNAMESPACE_MYCLASS_H symbol needs to be unique among all other header files in your project. A good approach is to include the namespaces followed by the class the header defines, with all names converted to uppercase and an underscore to separate each name. Append _H to the name to indicate it is for a header file. This approach will usually give you a unique but predictable name for each header file.
This tutorial has introduced you to the main C++ concepts needed to start writing your own Workspace plugin. The main points to remember are the following:
class is like a struct with functions added. Functions can be member functions, static functions or virtual functions. Constructors are a special type of function used only when objects of that class are created.virtual in a base class by providing a specialized implementation in the derived class.
The following books are highly recommended for further study on C++. These are widely recognized as excellent texts for learning and are generally very easy to read. They do, however, tend to assume a basic knowledge of C++. If you read them in the order listed after working through this tutorial, you should already know most of the things you need. They are all published by Addison Wesley.
As alternatives to the "Effective ..." series by Scott Meyers, you may also find the similar series by Herb Sutter to be useful:
Both the Effective ... and Exceptional ... series books are structured as lots of very short items addressing a particular issue or concept, usually no more than a few pages for each one. Each item generally has good examples and the overall format is great for learning concepts gradually at your own pace.
For a very thorough treatment of C++ templates, the following book comes highly recommended, but note that it covers advanced topics and would generally not be suitable for people relatively new to C++. While you do not need to know anything about templates to follow the simple tutorials, Workspace uses templates quite extensively to hide most of the complexity from plugin developers:
Finally, while not being specific to C++, there is one book that belongs on the shelf of any serious software developer, regardless of language:
This last book is pretty much accepted as the book on design patterns. It shows a number of very useful techniques for addressing common needs in software development, each with an application example and source code showing how to implement it. Workspace itself frequently uses many of the patterns explained in this book.
Also note that there is a wealth of material online to assist with learning good C++. The SGI site on the Standard Template Library is still pretty much the most complete and well structured online reference to C++'s STL:
There is also quite an extensive C++ FAQ available which, at the time of writing, could be found at:
You might also find the comp.lang.c++.moderated newsgroup useful for asking questions and receiving help, but check the above FAQ before posting.
The following tutorial is suggested as the next step: