Introduction
It is often desirable to create a workflow which repeats a task or iterates over a sequence of objects. This tutorial will show you how to create loops in Workspace to achieve this. In this the tutorial, you will:
- Create three different types of loops using the ForLoop, ConditionalLoop and FileLoop operations.
- Learn how to accumulate data across iterations of a loop
Contents
ForLoop: Creating a loop with a defined number of iterations
A loop is a part of a workflow that can execute multiple times, generally for the purpose of producing different results during each iteration. In Workspace, looping is managed through specialised nested Workspace operations. The inputs to these loop operations control how many times the nested Workspace's content is executed and how its input/output data is managed.
The first loop we are going to look at in this tutorial is the ForLoop operation. Similar to the For construct available in many programming languages, the ForLoop iterates between a start and end range, updating an internal counter value by a specific step value for each iteration.
- Note
- Previous versions of Workspace used what was known as the CountedLoop operation for this purpose. This operation has now been deprecated and so is not available for use in new workflows. For information about the CountedLoop operation, please consult the documentation in Workspace v5.4.2.
Let's create our first loop:
- Create a new, blank workflow.
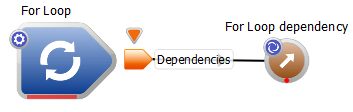
- From the Operation Catalogue, drag a ForLoop operation onto the canvas.
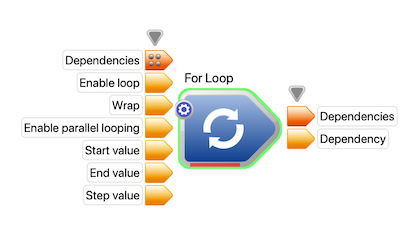
Creating a ForLoop operation
- Click on the ForLoop to select it, then look at the Operation Editor.
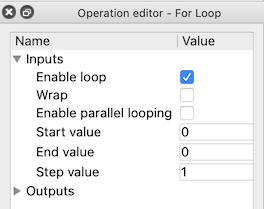
The ForLoop input values
- Enable loop: If enabled the loop will execute.
- Wrap: If enabled, when the Counter value equals the End value, Counter value will be returned to the Start value, causing the loop to wrap around, and execute again from the beginning.
- Start value: The starting value of the loop.
- End value: (inclusive) The value of the Counter value that will be output on the last iteration of the loop. The loop will execute (End value - Start value + 1) / Step value times.
- Step value: The increment to add to Counter value after each iteration.
- Counter value: The value of the Counter value that will be output on the first iteration of the loop.
- Enable parallel looping: If enabled, the ForLoop will attempt to execute iterations in parallel, making the best use of the number of cores on the local machine, as well as any remote processing resources specified in the parallel / remote execution configuration in the Workspace settings. For more information about remote / parallel execution in Workspace, please see the parallel / remote tutorials.
- Set the Start value to 1
- Set the Step value to 1
- Set the End value to 10
- Now that we've created our loop operation, we need to create some operations for the loop body. Start by double clicking the loop operation to navigate into it. By default, the ForLoop contains a WorkspaceInput corresponding to the Counter value input, a Dependency output and another WorkspaceInput called First iteration?. We are going to modify the workflow to log some text, then pause for a brief period of time, emulating a compute intensive task.
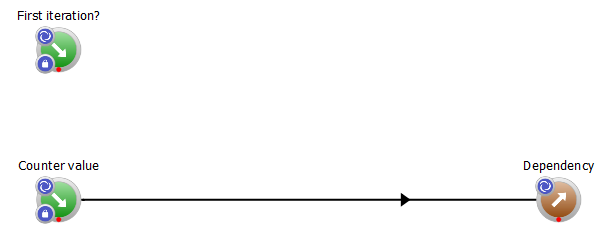
The default contents of a ForLoop's body
- From the Operation Catalogue, drag the LogText operation onto the workflow.
- Drag the Pause operation onto the canvas
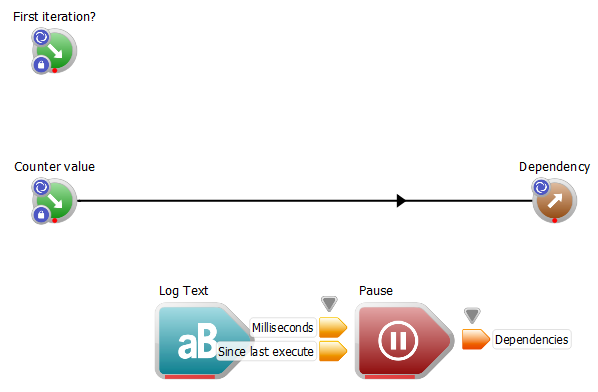
Creating the LogText and Pause operations
The Pause operation stops execution for a specified number of milliseconds.
- Connect the Counter value output of the ForLoop operation to the Text to log input of the LogText operation.
- Connect the dependencies output of the LogText operation to the dependencies input of the Pause operation.
- Connect the dependencies output of the Pause operation to the dependencies input of the Dependnency WorkspaceOutput operation.
- Remove the connection between the CounterValue WorkspaceInput and the Dependency WorkspaceOutput. Your workflow should now look like this:
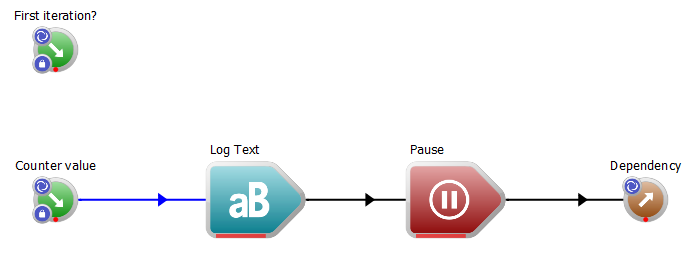
The workflow after building the loop body
If we were to execute the workflow now, nothing would happen as there is no WorkspaceOutput at the top level. To resolve this:
- Click the Root tab to navigate back to the root workflow
- Right-click the Dependency output of the ForLoop operation and select "Create Workspace output" in the context menu.
The top-level workflow after adding the output
- Execute the workspace. Notice the Progress Bars on the ForLoop and Pause Operations as the workflow executes: In the log, you should see the following, each line added one at a time after the Pause operation has completed executing:
1
2
3
4
5
6
7
8
10
Just in case you get stuck, a sample workflow has been provided for you.
ConditionalLoop: Creating a loop with an iteration condition
Workspace provides a way to loop continuously while a particular condition remains satisfied. There are many situations where this is desirable, one of which is to allow a model or solver to periodically output to the parent workflow. For example, a solver can save its internal state and periodically output its data, along with a boolean "StillComputing" output to indicate whether or not its output is complete. As long as the value of StillComputing is true, executing the solver within the loop will continue to advance it towards completion.
To achieve this kind of iteration in Workspace, we need to make use of the ConditionalLoop operation. It works by providing a mechanism for the loop's contents to feed back to the operation itself whether or not to continue executing. This is done through the use of a specifically named Keep looping? WorkspaceOutput operation. If the data provided to this WorkspaceOutput is ever the value "false", the loop terminates.
- Note
- This function in Workspace was previously served by the WhileLoop operation. The WhileLoop operation is now deprecated and should be replaced, where possible, with the ConditionalLoop operation.
In this example, we are going to create a ConditionalLoop that operates in much the same way as the ForLoop example, except the internal counter will be maintained within our loop.
- Create a new, blank workflow.
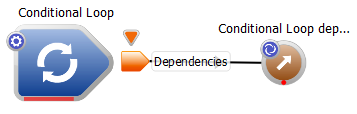
- From the OperationCatalogue, drag a ConditionalLoop operation onto the canvas.
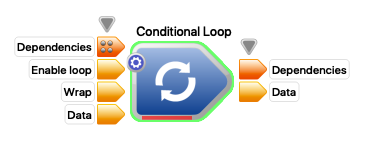
Conditional loop
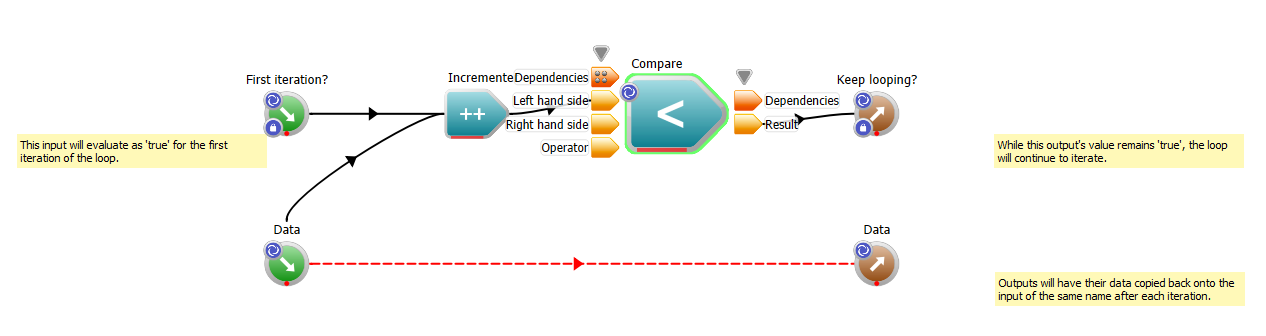
- Double-click on the ConditionalLoop operation to navigate into it and see its contents. By default, the ConditionalLoop contains the following:
- A WorkspaceInput of type Dependency named First iteration?.
- A WorkspaceOutput of type bool named Keep looping?. This output controls whether or not the loop continues to execute. If assigned a value of false, the loop will terminate.
- A WorkspaceInput and corresponding WorkspaceOutput, both named Data. These will be discussed in more detail in the next section about passing data between iterations.
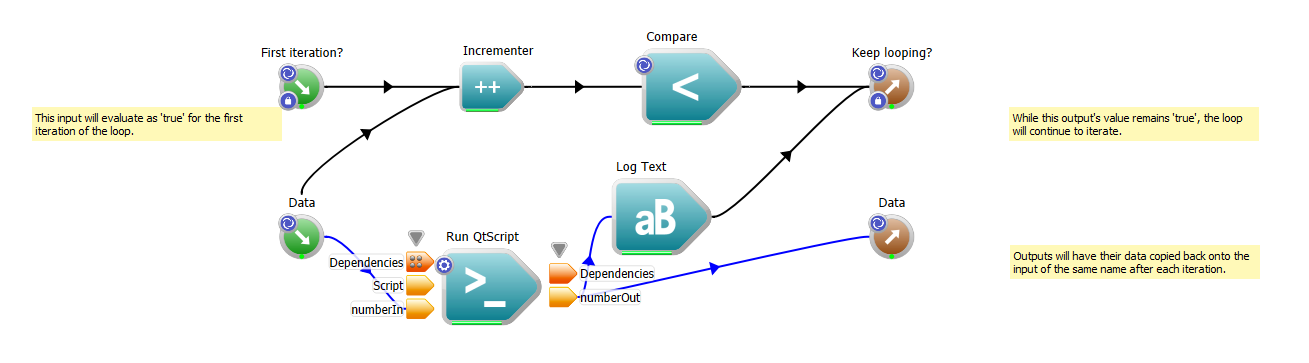
- From the OperationCatalogue, drag a Incrementer operation onto the canvas
- Create a connection from the Dependencies output of the Data WorkspaceInput to the Dependencies input of the Incrementer operation. This will cause the Incrementer to increment at the commencement of each iteration of the loop.
- Create a connection from the Dependencies output of the First iteration? WorkspaceInput operation to the Reset input of the Incrementer operation. This will cause the Incrementer to reset to 0 on the first iteration of the loop.
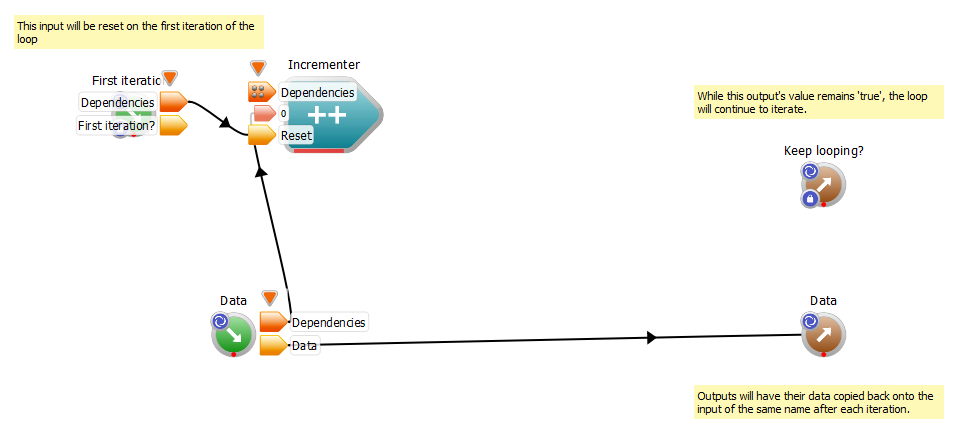
The incrementer operation added to our loop body.
- To replicate our termination condition, we are going to use the Compare operation. Drag one of these from the OperationCatalogue onto the canvas. Change its data type to "int"
- Connect the Value output of the Incrementer operation to the Left Hand Side input of the Compare operation.
- Click on the Compare operation and in the Right hand side input enter the value 10 and change the operator to "Less"
- Connect the Result output of the Compare operation to the Keep looping? input to the Keep looping? WorkspaceOutput operation.

Adding the IntegerEqual operation.
- Right-click the Data WorkspaceInput operation and select "Properties" in the context menu.
- Navigate to the Data tab, and change its datatype to int. You will notice that after doing this, the connection becomes red. This is because the datatypes of the source and destination ends of the connection no longer match.
Initially, the connection becomes invalid.
- Repeat the above two steps for the Data WorkspaceOutput operation.
- We don't need the connection between the two Data operations, so remove it by right-clicking it and selecting "Remove connection" from the context menu.
- From the OperationCatalogue, drag on a "RunQtScript" operation. This operation will serve as our formula for transforming the Data input. In the configuration dialog, give it a single input named "numberIn" and a single output named "numberOut".

Adding a script to transform the data.
- Connect the Data WorkspaceInput to the numberIn input of the RunQtScript operation.
- Connect the numberOut output of the RunQtScript operation to the Data input of the Data WorkspaceOutput operation.
- Click on the RunQtScript operation and in the script input, enter the following
numberOut = numberIn * 2;
The modified loop body containing the new cross-iteration data processing.
- Add a LogText operation to the workflow by dragging it from the OperationCatalogue onto the canvas.
- Connect the numberOut output of the RunQtScript operation to the Text to log input of the LogText operation.
- Connect the Dependencies output of the LogText operation to the Dependencies input of the Keep looping? WorkspaceInput operation.
- Finally, return to the top-level by clicking on the Root tab, and create a WorkspaceOutput at the top-level by right clicking on the Dependencies output of the ConditionalLoop operation.
Completed ConditionalLoop workflow.
- Set the Data value to 2
If we execute the workflow, we should see in the log:
4
8
16
32
64
128
256
512
1024
2048
Just in case you get stuck, a sample workflow has been provided for you.
Passing data between iterations
A requirement of many loops is that some data from a previous iteration be built upon in subsequent iterations. All loop operations in Workspace support this ability, provided that the loop is not being iterated in parallel.
- Note
- A parallel iterating loop cannot make use of this feature, as a parallel iterating loop cannot rely on the order of its iterations. To build on previous iterations' data in parallel loops, we recommend an approach that uses cache keys in a database.
To make use of this looping feature, users need only create a WorkspaceOutput and WorkspaceInput with identical names. At the completion of a loop iteration, Workspace will copy data from the WorkspaceOutput onto the WorkspaceInput of the same name.
In the example for Conditional loop (above), the data stored in the WorkspaceOutput named Data is copied to the WorkspaceInput named Data at the completion of each loop iteration. Which is why each output from the loop is doubled (as the calculation in the RunQtScript operation).
If we return to the root level of the workflow from the previous example, select the ConditionalLoop operation and enter the value "1" for the Data input, executing the workflow will now yield the results:
2
4
8
16
32
64
128
256
512
1024
Just in case you get stuck, a sample workflow has been provided for you.
This inter-iteration input data passing technique can be used with any Workspace-derived loop.
FileLoop: Iterating over files and directories
The FileLoop is capable of iterating over a set of files in a directory, executing a workflow for each iteration. In this example, we're going to use the Workspace samples directory to test the FileLoop. To use it:
- Create a new workflow.
- From the OperationCatalogue, drag a FileLoop operation onto the canvas.
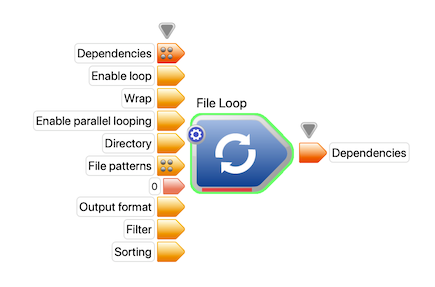
The FileLoop operation.
- Double click on the FileLoop operation to navigate into it and view its contents.
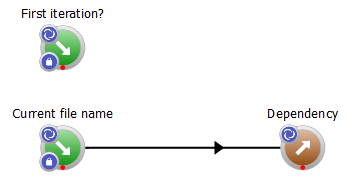
The default contents of the FileLoop operation.
- Right-click the connection between the Current file name and Dependency operations and in the context menu select "Remove connection"
- From the OperationCatalogue, drag a LogText operation onto the canvas.
- Connect the Current file name output of the Current file name WorkspaceOutput operation to the Text to log input of the LogText operation.
- Connect the Dependency output of the LogText operation to the Dependency input of the Dependency WorkspaceOutput operation.
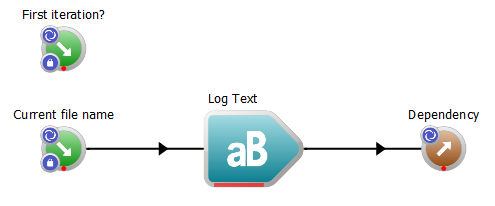
The completed FileLoop loop body.
- Navigate back to the Root workflow and select the FileLoop operation. In the OperationEditor, modify the Directory input to the path to your Workspace examples. By default this is
/usr/local/csiro.au/workspace/doc/Workspace/Examples on OSX, /opt/csiro.au/workspace/doc/Workspace/Examples on Linux and C:/Program Files/csiro.au/Workspace/doc/Workspace/Examples on Windows.
- Right-click the Dependencies output of the FileLoop operation and select "Create Workspace output" in the context menu.
If we execute the workflow, we should see something similar to the following (exact content will differ in subsequent versions of Workspace as more tutorials and example workflows are added):
/usr/local/csiro.au/workspace/doc/Workspace/Examples/datasample.csv
/usr/local/csiro.au/workspace/doc/Workspace/Examples/livable_cities_2013.csv
/usr/local/csiro.au/workspace/doc/Workspace/Examples/particle_sample.vtk
/usr/local/csiro.au/workspace/doc/Workspace/Examples/plotsample.csv
/usr/local/csiro.au/workspace/doc/Workspace/Examples/provenance.wsx
/usr/local/csiro.au/workspace/doc/Workspace/Examples/rsimplebatch.R
/usr/local/csiro.au/workspace/doc/Workspace/Examples/sample_batch.wsx
/usr/local/csiro.au/workspace/doc/Workspace/Examples/sample_branching.wsx
/usr/local/csiro.au/workspace/doc/Workspace/Examples/sample_branching2.wsx
/usr/local/csiro.au/workspace/doc/Workspace/Examples/sample_charts.wsx
/usr/local/csiro.au/workspace/doc/Workspace/Examples/sample_conversion.wsx
/usr/local/csiro.au/workspace/doc/Workspace/Examples/sample_external_script.wsx
/usr/local/csiro.au/workspace/doc/Workspace/Examples/sample_externalworkspace.wsx
/usr/local/csiro.au/workspace/doc/Workspace/Examples/sample_hellopython.wsx
/usr/local/csiro.au/workspace/doc/Workspace/Examples/sample_helloworkspace.wsx
/usr/local/csiro.au/workspace/doc/Workspace/Examples/sample_logwithtimestamp.wsx
/usr/local/csiro.au/workspace/doc/Workspace/Examples/sample_looping.wsx
/usr/local/csiro.au/workspace/doc/Workspace/Examples/sample_modifyandwrite.wsx
/usr/local/csiro.au/workspace/doc/Workspace/Examples/sample_parallel.wsx
/usr/local/csiro.au/workspace/doc/Workspace/Examples/sample_parallel3.wsx
/usr/local/csiro.au/workspace/doc/Workspace/Examples/sample_python_mesh_interface.wsx
/usr/local/csiro.au/workspace/doc/Workspace/Examples/sample_pythondata.wsx
/usr/local/csiro.au/workspace/doc/Workspace/Examples/sample_pythonmodules.wsx
/usr/local/csiro.au/workspace/doc/Workspace/Examples/sample_readanddisplay.wsx
/usr/local/csiro.au/workspace/doc/Workspace/Examples/sample_rtutorial.wsx
/usr/local/csiro.au/workspace/doc/Workspace/Examples/sample_scripting.wsx
/usr/local/csiro.au/workspace/doc/Workspace/Examples/sample_scripting2.wsx
/usr/local/csiro.au/workspace/doc/Workspace/Examples/sample_sqldatabase.wsx
/usr/local/csiro.au/workspace/doc/Workspace/Examples/sample_tutorial1.wsx
/usr/local/csiro.au/workspace/doc/Workspace/Examples/sample_tutorial2.wsx
/usr/local/csiro.au/workspace/doc/Workspace/Examples/sample_tutorial3.wsx
/usr/local/csiro.au/workspace/doc/Workspace/Examples/sample_tutorial4.wsx
/usr/local/csiro.au/workspace/doc/Workspace/Examples/sample_tutorial5.wsx
/usr/local/csiro.au/workspace/doc/Workspace/Examples/sample_volren.wsx
/usr/local/csiro.au/workspace/doc/Workspace/Examples/volume_sample.raw
/usr/local/csiro.au/workspace/doc/Workspace/Examples/water_sample.vtk
/usr/local/csiro.au/workspace/doc/Workspace/Examples/zmq_pub.wsx
/usr/local/csiro.au/workspace/doc/Workspace/Examples/zmq_reply.wsx
/usr/local/csiro.au/workspace/doc/Workspace/Examples/zmq_request.wsx
/usr/local/csiro.au/workspace/doc/Workspace/Examples/zmq_sub.wsx
Summary
This concludes the tutorial on looping. We have now learned how to:
- Create three different types of loops using the ForLoop, ConditionalLoop and FileLoop operations.
- Learn how to accumulate data across iterations of a loop
For more information on any of the loop operations, see:
ForLoop ConditionalLoop FileLoop
Next Steps
The next tutorials in this series are: