Introduction
Sometimes it is convenient to add plugin-specific settings to the Workspace editor.
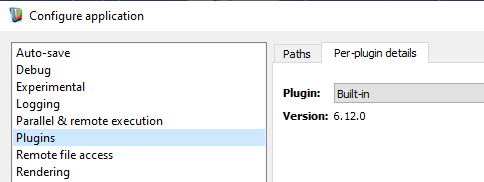
Per-plugin details
This is done by using the code wizard to create a stub form and integrate it into the workspace-editor. Use QtDesigner to edit the form and create a widget that lets the user set any user-configurable parameters. It can be accessed from the Settings menu.
You can decide whether it is added as its own entry in the main list of the Configure application menu (as exemplified by the Rendering plugin in the figure above), or to the Per-plugin details tab shown when you select Plugins (as exemplified by the Built-in plugin in the figure above).
By default, a plugin has no configurable parameters.
By the end of the tutorial we will:
- Understand how to use the built-in code wizard to create a blank custom configuration widget
- Understand how to use Qt Designer to design the widget's user interface
- Understand how you can use a customised configuration widget within Workspace
Contents
Sample files used and modified in this tutorial
Using the "Create custom plugin settings configuration" code wizard
In this tutorial, we're going to use the Create custom plugin settings configuration wizard to add a skeleton configuration settings widget to our simple plugin. To start the wizard:
- Navigate to the
Development menu and select Advanced -> Integrate plugin into Workspace Editor -> Create custom plugin settings Widget...
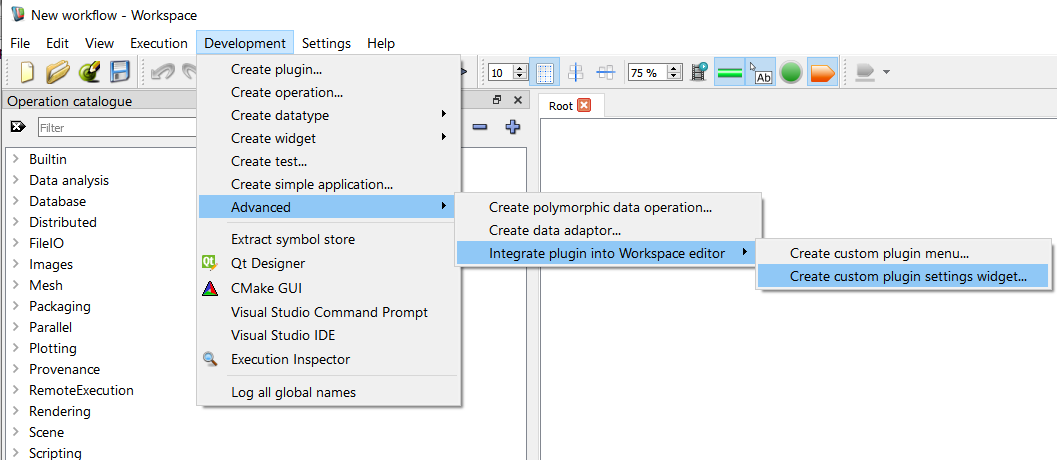
Finding the code wizard
- A window will be displayed that looks something like this:
Create custom plugin settings configuration
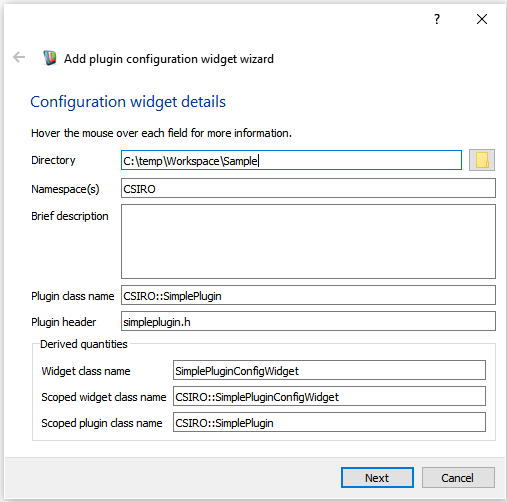
We can use this code wizard to generate the skeleton code required for a custom widget. Let's start by filling in the fields on the form:
- Directory: The directory in which our widget source files will be created. Point this to the same location that your plugin source is located.
- Namespace(s): The namespace used for the class. We will use
CSIRO as we did in the previous tutorial.
- Brief description: This will appear in the code as a short comment describing kind of configuration you are planning. we will enter the text,
"Add a project name and logging option"
- Plugin class name: The fully-scoped name of the plugin class that will contain this widget. We're going to use the plugin we created previously,
CSIRO::SimplePlugin.
- Plugin header: The header that contains the definition of the containing Workspace plugin. Again, we refer to the file we generated in previous tutorials:
simpleplugin.h
- Note
- At any time you can check the purpose of these fields by hovering over them with the mouse and reading the tooltips (as shown above).
Our form will now look something like this:
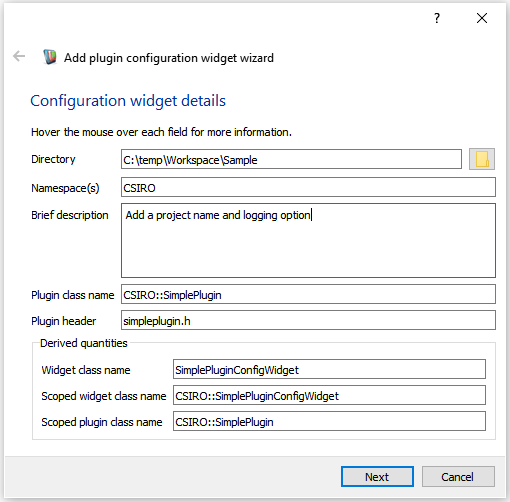
Our values entered into the wizard
If we now look at the bottom of the plugin wizard, we will see some derived values. Workspace is showing us the name of the scoped class name of the new widget, as well as the scoped class name of the plugin that it is going to add it to. Next:
- Click the Continue or Next button
As we did with the data type wizard, we now get to select a copyright notice.
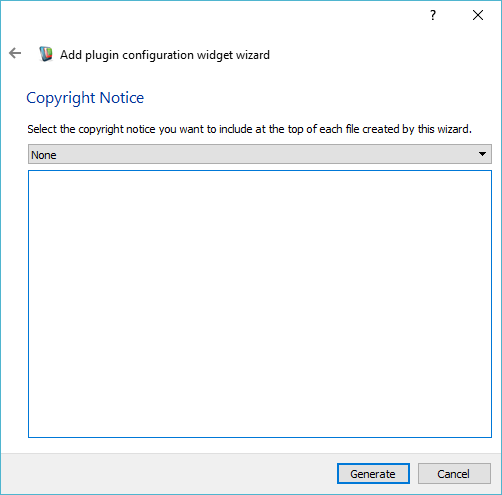
Select none for this tutorial
Workspace will now generate the code for our new widget and place it in the directory that we selected earlier (the same directory into which we generated our plugin). If you navigate to this directory, you'll see that it has the following contents:
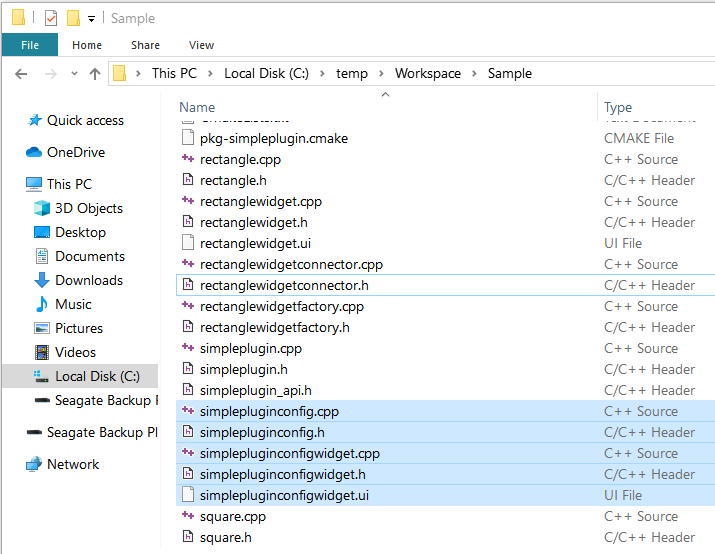
The contents of the plugin directory after generating the configuration settings widget
For more details about the code generated, see Integrating a custom plugin settings widget into the Workspace Editor - looking at the code or click on one of the links to individual files below.
The new files added are:
- simplepluginconfig.h This file is the C++ header for the plugin-workspace interface. It contains a class that extends the Application::PluginConfig base class
- simplepluginconfig.cpp This file contains the C++ source for the plugin-workspace interface It contains the definition of the class declared in simplepluginconfig.h
- simplepluginconfigwidget.h This file is the C++ header for the configuration settings widget. It contains a class that extends the QWidget base-class.
- simplepluginconfigwidget.cpp This contains the C++ source for the new widget. It contains the definition of the class declared in simplepluginconfigwidget.h
- simplepluginconfigwidget.ui This file contains the XML description of the widget's user interface. It can be interactively edited in the Qt Designer utility. When the plugin is compiled, UI controls defined in this file are compiled by Qt into a special ui_ simplpluginconfigwidget.h file, which contains the actual C++ code defining the basic user interface.
Some existing files are modified by the wizard, these are:
We need to customise two of the new files.
And possibly a third:
And we'll also customise one of the existing files, calculaterectanglearea.cpp to make use of the new settings (see Add code to your regular operations that accesses the settings)
Their structure and how modify them is explained below in the section Customising the plugin code
Rebuilding
Now that we've added our new files to the plugin, we will need to take the steps we did in the previous tutorial to compile our tutorial:
- Launch CMakeGui from the Workspace's Development menu
- Click Configure
- Click Generate
- Following the steps from the Writing a Simple Workspace Plugin tutorial, recompile your plugin for your target platform
Customising the configuration widget
Next up, we will need to use Qt Designer to modify the user interface description file, simplepluginconfigwidget.ui. To do this:
- From the Workspace editor's Development menu, launch Qt Designer
- When the application launches, select
File > Open and in the provided dialog, browse to the location of your simplepluginconfigwidget.ui and click the Open button.
- You should see an empty form something like this.
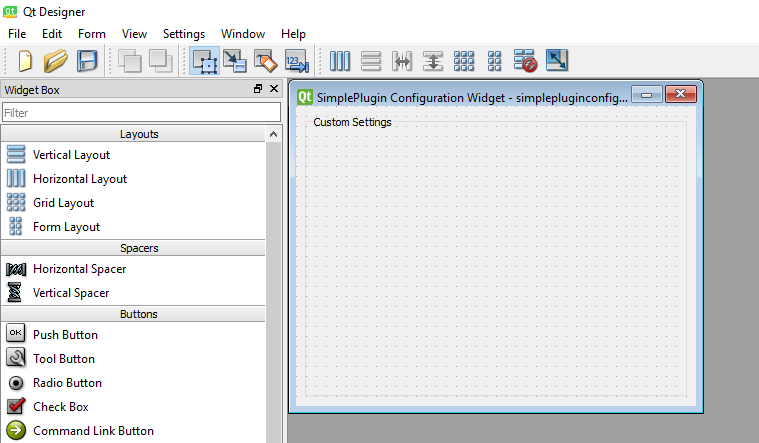
The default Configuration Widget in Qt Designer
The wizard has automatically added a Group Box titled Custom Settings. We are going to add some child widgets that we’ll use to display our configuration settings.
- From the WidgetBox on the left of the screen, drag and drop a Label on to the form
- Double-click the label and change its text to Project
- Drag a LineEdit onto the form and change its objectName property to project
- Drag a CheckBox onto the form, change its text to Enable Logging and change its objectName to enableLogging
- Right click on som empty space and select Lay Out in a Form Layout
- Click the Save button and close Qt Designer
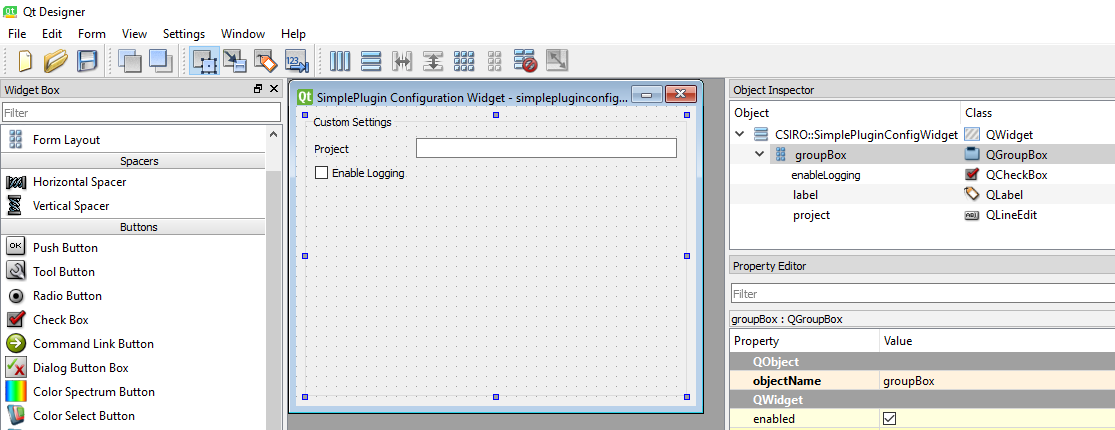
The updated Configuration Widget in Qt Designer
Now that you've done that recompile the plugin. This will update the Qt generated UI code so that we can reference it from within our simplepluginconfigwidget.cpp file. .
Customising the plugin code
Add the code that controls saving and loading your settings
In this example, we will save the settings into the program's Settings cache so that they will be available next time the Workspace editor is started up. The first step is to notify the program when either of the settings is changed. This is done in the constructor - connect a signal from each widget to the class's modified signal
SimplePluginConfigWidget::SimplePluginConfigWidget(QWidget* parent) :
QWidget(parent),
ui_(std::make_unique<
Ui::SimplePluginConfigWidget>())
{
ui_->setupUi(this);
bool success = true;
success = connect(ui_->project, &QLineEdit::editingFinished, this, &SimplePluginConfigWidget::modified);
success = connect(ui_->enableLogging, &QCheckBox::stateChanged, this, &SimplePluginConfigWidget::modified);
reload();
}
Definition: remoteschedulerwidget.h:44
The next step is to modify the save() and reload() functions to control the user interface. Add the following code which saves the loads the data as two text values:
void SimplePluginConfigWidget::save()
{
DataExecution::SerializedItem topItem = Application::Settings::getInstance().getPluginSettings(SimplePlugin::getInstance().getName());
topItem.removeAllChildren();
DataExecution::SerializedItem childItem = topItem.firstChild();
childItem = topItem.addChild("Project");
childItem.setText(QString("%1").arg(ui_->project->text()));
childItem = topItem.addChild("EnableLogging");
childItem.setText(QString("%1").arg(QString::number(ui_->enableLogging->isChecked())));
Application::Settings::getInstance().save();
}
void SimplePluginConfigWidget::reload()
{
if (!Application::Settings::getInstance().isLoaded())
{
Application::Settings::getInstance().load();
}
DataExecution::SerializedItem topItem = Application::Settings::getInstance().getPluginSettings(SimplePlugin::getInstance().getName());
if (topItem.hasChildren())
{
DataExecution::SerializedItem child = topItem.firstChild("Project");
ui_->project->setText(child.getText());
DataExecution::SerializedItem logChild = child.nextSibling("EnableLogging");
ui_->enableLogging->setChecked(logChild.getText() == "1");
#define WS_ASSERT_RUNTIME(cond)
Definition: errorchecks.h:147
Add code to your regular operations that accesses the settings
Now we'll edit the calculaterectanglearea.cpp file so that we can see how you might use the settings:
bool CalculateRectangleAreaImpl::execute()
{
const auto& rectangle = *rectangle_;
auto& area = *area_;
area = rectangle.getWidth() * rectangle.getHeight();
if (!Application::Settings::getInstance().isLoaded())
{
Application::Settings::getInstance().load();
}
DataExecution::SerializedItem topItem = Application::Settings::getInstance().getPluginSettings(SimplePlugin::getInstance().getName());
DataExecution::SerializedItem projectItem = topItem.firstChild("Project");
DataExecution::SerializedItem logItem = projectItem.nextSibling("EnableLogging");
if (logItem.getText() == "1")
{
logLine(LOG_INFO, tr("Calculate Rectangle [%1, %2]").arg(projectItem.getText()).arg(QDateTime::currentDateTime().toString()));
}
return true;
QString name
Definition: packagethirdparty.cpp:188
Add
to the included headers if it is not already present.
Do you want your own entry in the main list?
By default, users will access your widget via the plugins entry in the Configure application dialog box. If your plugin has a lot of settings that you think the user will access frequently, you'll probably want an entry in the main list (as the Rending plugin has in the figure at the top of the page). To do this, edit the isTopLevelConfig() entry in simplepluginconfig.cpp so that it returns true.
bool SimplePluginConfig::isTopLevelConfig() const
{
return false;
}
Now that we've made those changes, we can now recompile and load up Workspace.
Using the Settings
Find the new configuration settings widget by Clicking on the Settings menu- Configure application…
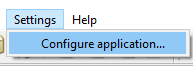
The Settings menu
Then navigate to the Per-plugin details tab of the Plugins item and find the Simple per-plug details entry
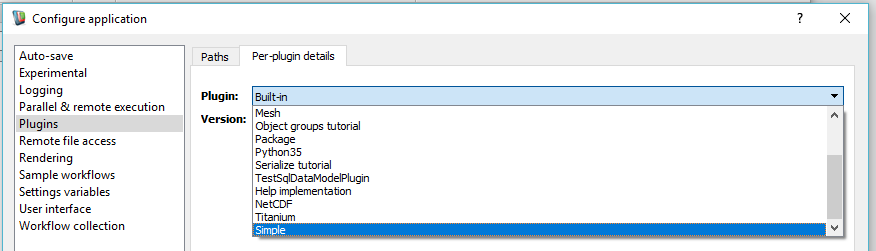
Finding the per-plugin details for the Simple plugin
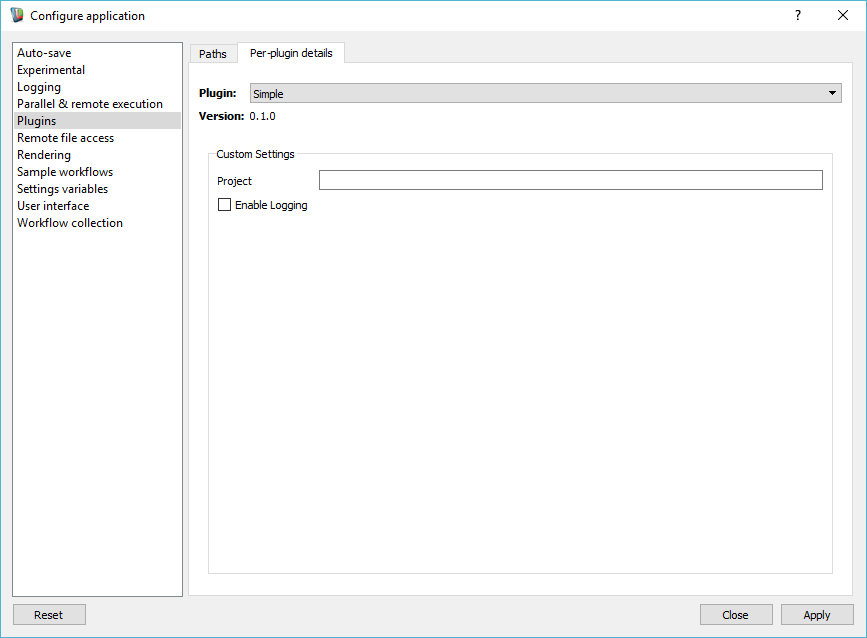
The initial settings
We are going to give the project a name Workspace Configure Settings Tutorial and enable logging
- Fill in the widgets
- press Apply and Close
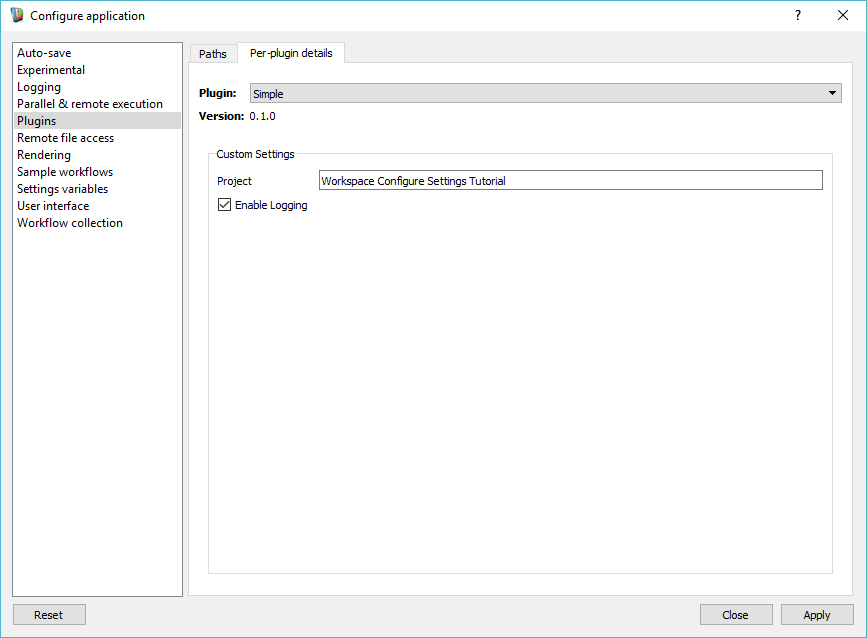
After configuring the plugin
Now ensure that you have a blank Workspace canvas
- Drag a CalculateRectangleArea operation onto the Workspace canvas from the Operation Catalogue
- Add a Workspace Output
- Click on the a CalculateRectangleArea operation and set the Width to 20 and the Height to 50
- Run the workflow and note the Log contents
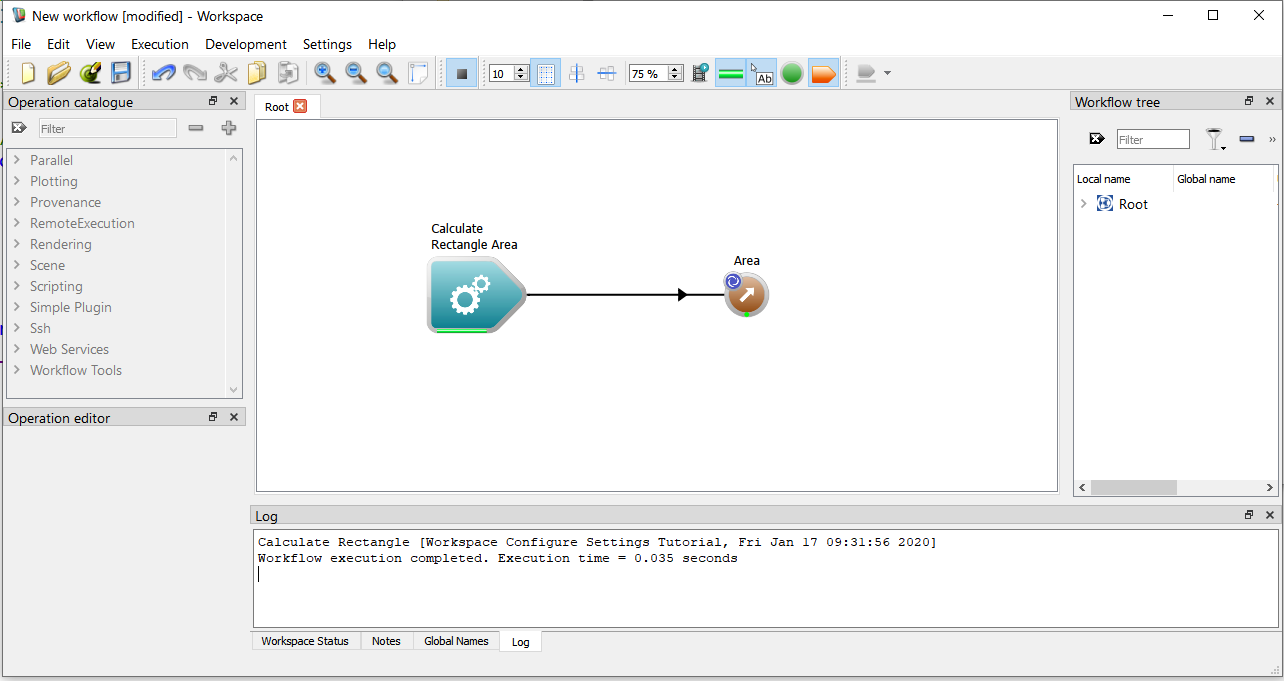
The log contents reflect the plugin settings
Try changing the configuration settings to see the effect.
Summary
Plugin-specific settings can be accessed from the Workspace editor's Settings menu. You
- Use the Create custom plugin settings configuration wizard to create a default configuration widget for your plugin
- Use Qt Designer to customise the configuration widget's user interface
- Edit your plugin code load and display your plugin's configuration settings within the Workspace editor
Next steps
The following tutorial is suggested as the next step: