Introduction
When you have created a workflow that you wish to reuse, you can avoid having to duplicate it by creating an external Workspace workflow. If you use it frequently, you can add it to the Operation catalogue and drag it into workflows like a Workspace operation (see Making an external workflow available in the Operation catalogue ). This tutorial explains what to do if you would like to make the workflow part of your plugin so that it will be available to everyone who installs the plugin just by dragging it in from the Catalogue.
Contents
Creating an External Workflow
- Create a new workflow, and drag your Calculate Rectangle Area widget onto the canvas created in the previous tutorial. Add additional operations to create the workflow shown below.
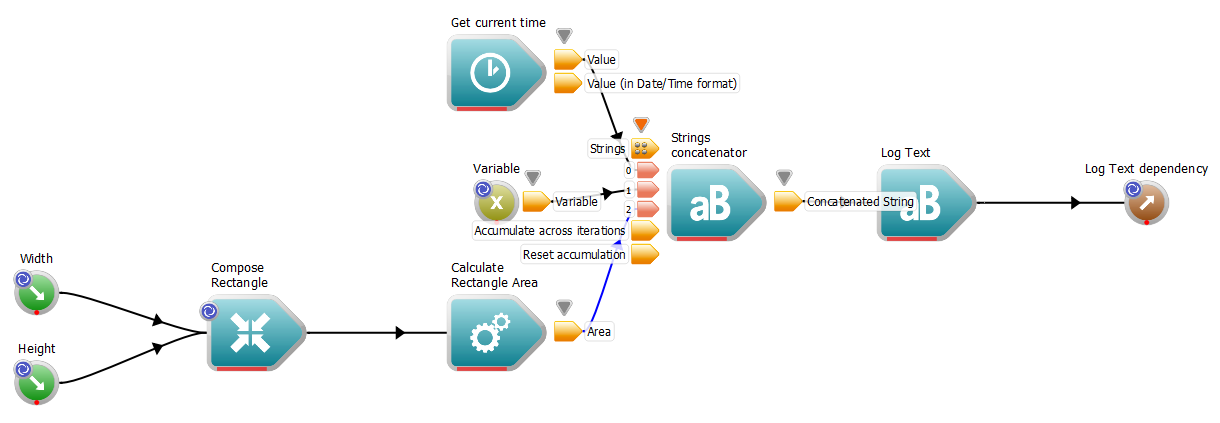
Target Workflow
- Set your Variable input to be "Current area is:" , and add a space after both it and the "Get current time" operation's "Format" input. Incorporate WorkspaceInput operations for all inputs, and WorkspaceOutput operations for outputs.
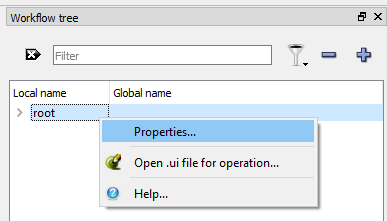
- Edit the workflow's metadata using the 'Workflow tree' dock. Right-click on the root item to bring up then context menu, then click on Properties
Editing the workflow properties (step 1)
- From the General tab, give the workflow a label (shown when it's in use on the workscape canvas)

Editing the workflow properties (step 2)
- From the Workspace tab, give the workflow a name and path for it in the Workspace catalogue
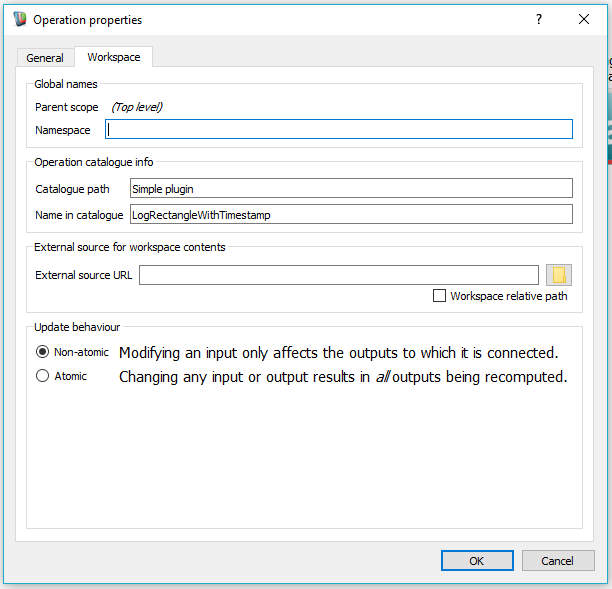
Editing the workflow properties (step 3)
- Save the workflow as an wsx file tutworkflowcat_log.wsx in the target plugin Collection subdirectory (use File->Save as)
Editing the Plugin Code
- Find the resource file simpleplugincollection_resources.qrc inside the subdirectory
- Add your new workflow to this file as a file resource:
<RCC>
<qresource prefix="/appdata/SimplePlugin">
<file>tutworkflowcat_log.wsx</file>
</qresource>
</RCC>
- Edit the simpleplugin.cpp file, and add the new workflow to the setup() function
bool SimplePlugin::setup()
{
addFactory(RectangleWidgetFactory::getInstance());
addWorkspaceCollection(":/appdata/SimplePlugin/tutworkflowcat_log.wsx");
return true;
}
Traits class for data objects of type T.
Definition: datafactorytraits.h:143
Traits class for operations of type T.
Definition: operationfactorytraits.h:64
- Recompile the plugin, and restart the Workspace editor as usual. The new workflow will appear as an operation in the workflow catalogue

The new operation in the Workspace catalogue
- You now have a workflow that keeps track of the area as the input width and height vary. You could use inside a larger workflow like the figure below
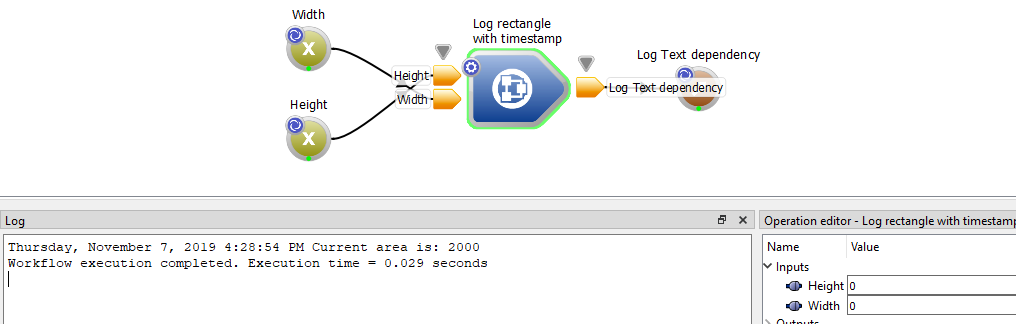
Target Workflow in use
Summary
You can include nested workflows within your plugin by
- saving it as an external workflow with Workspace inputs and outputs
- editing the parent resource file and plugin setup() function
After compilation, this will allow anyone using your plugin to drag your workflow in from the Operation Catalogue like regular operations.
Next steps
The following tutorial is suggested as the next step: