Introduction
Although Workspace does not provide integrated R Programming Language support, you can still easily leverage the functionality of the R Programming Language from within Workspace workflows. In this tutorial we show you how to easily call your R scripts, either by selecting R script files on disk or you can enter R script dynamically.
- Note
- Unlike QtScript (a.k.a. ECMAScript/JavaScrpit ) and Python, users must manually install the R Programming Language and runtime on target machines before you can use the "Run R Script" operation. Once installed you may use the Settings -> Configure application -> Settings variables dialog to identify the location of your R installation.
Contents
Just in case you get stuck, a sample workflow and a sample R script file have been provided for you.
Calling your R scripts
In this first tutorial we will introduce the "Run R Script" operation and show you how to call an existing R Script. This tutorial assumes you have already downloaded and installed the R Programming Language onto your machine.
- Enter "Run" into the Operation Catalogue and you will see all the scripting operations that Workspace provides:
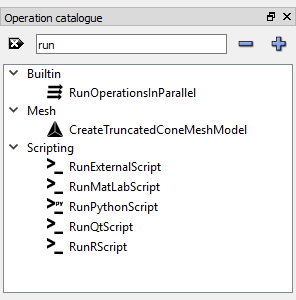
Finding the Run R Script operation in the Operation Catalogue
- Find the "Run R Script" Operation in the Operation catalogue and drag it onto the Workspace canvas. Depending on your current settings its Properties Dialog may open, if it does then leave/select Dependency as the data type and click OK.
- Select the "Run R Script" Operation on the canvas and look at the inputs and outputs in the Operation Editor. You will notice that the "Run R Script" Operation looks somewhat like the SystemCommand Operation - this is because the RunRScript Operation delegates almost all the work of running the R Script to a SystemCommand Operation.

Setting up the inputs to your Run R Script Operation
- The value in the R Runtime input may look like this
ws:settings:user:R . This tells the Operation to use the value set in the Settings -> Configuration -> Settings variables dialog within Workspace editor.
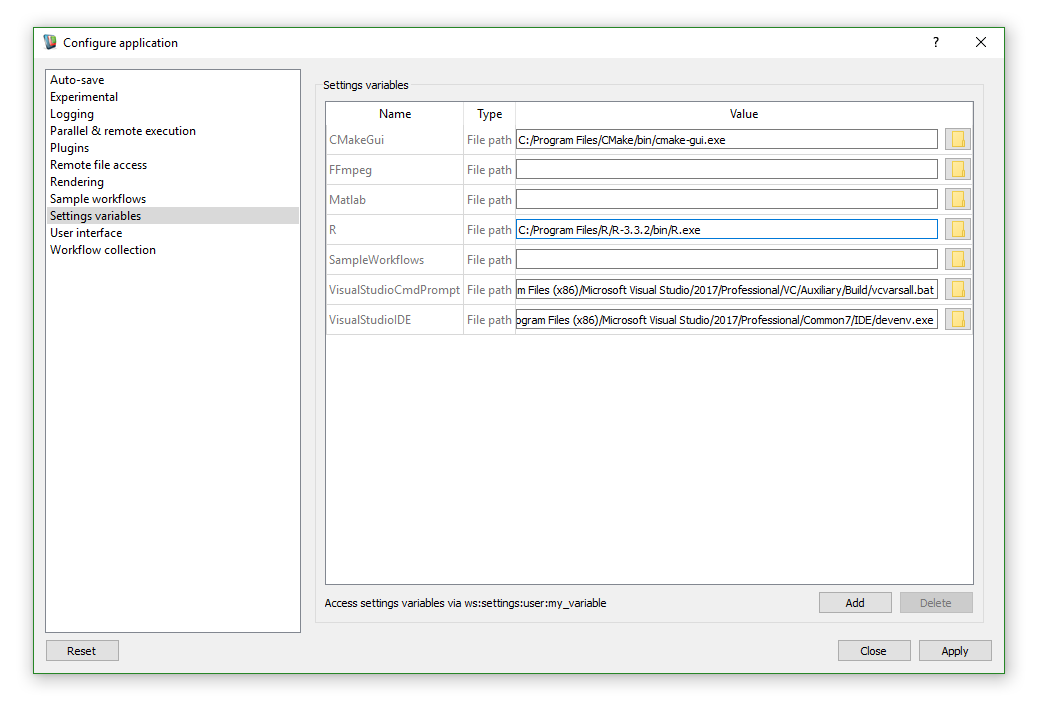
Setting the R path in Settings
You can use the default value of ws:settings:user:R if it has been set or you can set the "R runtime" input to the location of your R runtime executable. This will vary from machine to machine however, as an example, on my current machine this would be: C:/Program Files/R/R-3.3.2/bin/R.exe
Next you can either point to an R script file on disk using the "R script file" input or enter some R script in the "R script" input. In this first tutorial we will point to an R script file on disk.
- Note
- Please note, you cannot do both, that is you cannot point to a file AND enter R script in the "R script" input (you will get an error message if you do when you try to execute your "Run R Script" operation if you enter data in both inputs. An annoying problem is having a file specified and some whitespace in the "R script" input - so keep an eye open for that.
For now I will point to a file
C:/temp/RSimpleBatch.R
The contents of this file are:
    options(echo=TRUE)
    remove(list =ls())
    args <- commandArgs(TRUE)
    print(args)
    filename <- args[1]
    number <- as.integer(args[2])
    values <- rnorm(number)
    png(filename)
    plot(values)
    dev.off()
    Sys.getenv("R_EXAMPLE")
    summary(values)
You can create a file with the contents above and then point to that file in the "R script file" input.
- Note
- By the way: we are not experienced R developers and the code above, while it does work, is only a sample and may not be an example of "best practise" R script code. Any suggested improvements are most welcome!
- You should specify your R script "Log file" - even if you normally use the default R convention (which is to use the same filename as the input file replacing the .R extension with .Rout). If you do not specify the file, the "Run R Script" operation will make an educated guess as to what it will be - however if we get it wrong you may be looking at the wrong output and debugging your workflows could be very difficult. For this example I will use:
C:/temp/RSimpleBatch.Rout
- Next we will enter the "Working directory", I will set it to
C:/temp on my Windows machine.
- You may have noticed that our R script accesses arguments - it is time to add a value for the argument to our script. Remember you can add inputs to an Input array either by right clicking on the Input array and selecting "Add input element" or by double clicking on the Input array:
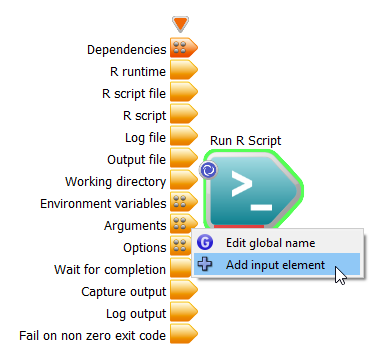
Adding array inputs for the Arguments input
- Add one new input element to the Argument array. Then in the Operation Editor set the argument's value to:
42
- You may have noticed that our R script access an environment variable called
SCRIPT_OUTPUT_FILENAME. Actually we use a little "sleight of hand" at this point. If you supply a value to the "Output file" input of the "Run R Script" operation, then we do three things with that value. Firstly we pass it to the script as the environment variable SCRIPT_OUTPUT_FILENAME. Secondly, if you select a type for the RunRScript Operation, then after the script executes we attempt to open the file and extract an object of that type from the file and lastly we pass that value to the output named "Script output file" - so downstream Operations can access the file.
- So on my Windows machine I will enter
C:/Temp/output.png for the "Output file" input value.
- Double click on the "Run R Script" operation to bring up its Properties dialog and on the Data tab set the type to QImage.

Setting the operations data type
- Lastly, let us add three widgets to see what our output our opertion produces:
-
Add an ImageWidget to display the "Script output"
-
Add a QTextEdit widget to your "Log output"
-
Add a QLineEdit widget to your "Script output file"
Execute your workflow and you should see something like the following:
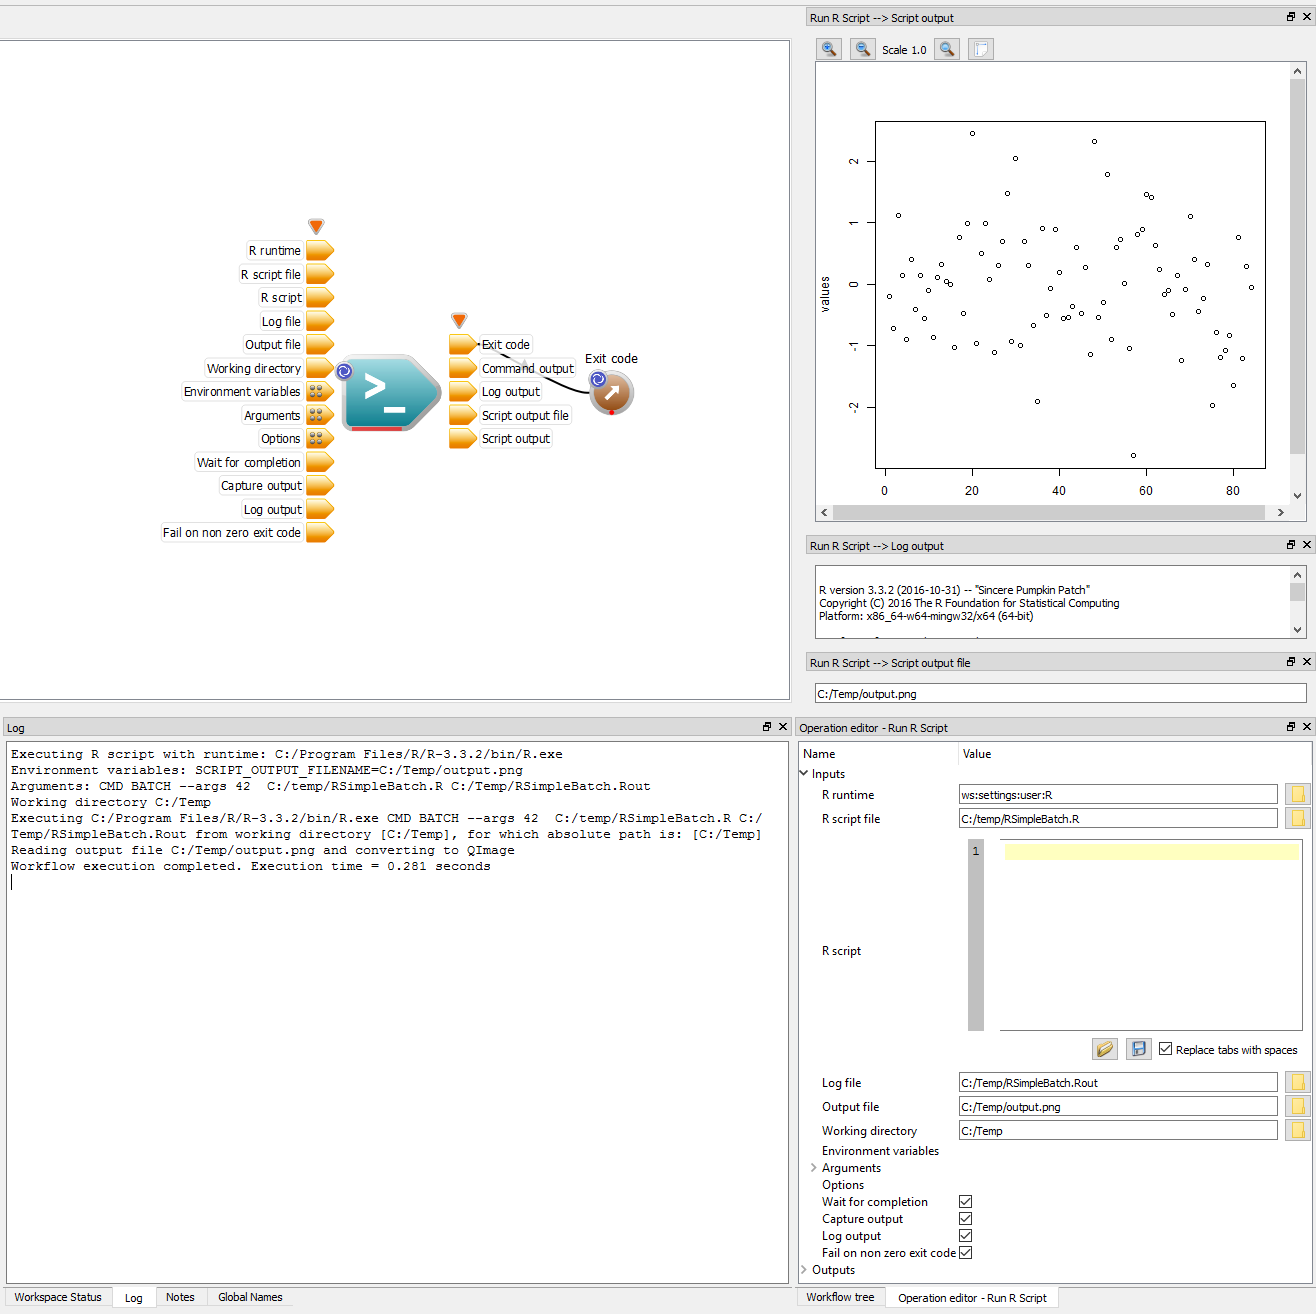
Executing your first Run R Script operation
As an exercise for the reader, change your argument's value from 42 to another value, for example 4200, and rerun the workflow to see how the output image changes.
Some items to note:
- If you looked at the Run R Script's "Command output" you would see this is empty. There is normally only output here if a system error occurs - so this being empty is a good sign.
- You can scroll up and down in the QTextEdit widget (with the title "Run R Script --> Log output") to see what logging output the script produced:
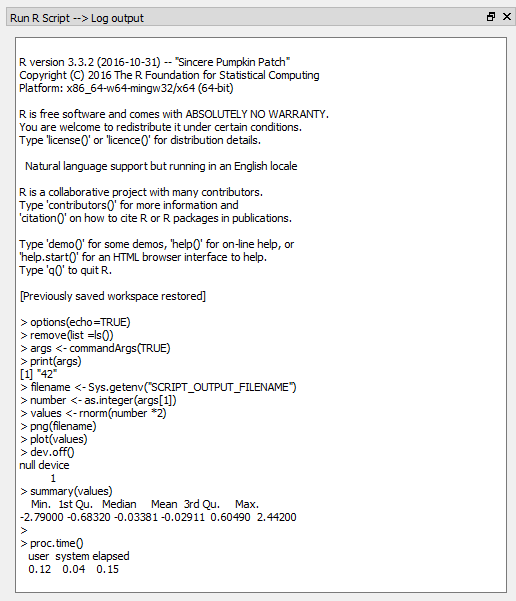
Script output
- Depending on your logging settings, you may see output such as this in the Log window - this makes it pretty easy to see what is happening "under the hood". You may also notice parameters such as
CMD and BATCH, these parameters must always be supplied when running R scripts, so the "Run R Script" operation silently inserts them so you do not have to. Additionally the "Run R Script" operation knows to add –args when arguments are being passed. Executing C:/Program Files/R/R-3.2.2/bin/R.exe CMD BATCH --args 42 C:/Temp/RSimpleBatch.R C:/Temp/RSimpleBatch.Rout from working directory [C:/Temp], for which absolute path is: [C:/Temp]
Call your R scripts with some common options
You will also have noticed that you can specify "Options" when running your R scripts. Again, not that we are R programming experts, but two commonly used options seem to be:
--vanilla
--slave
These options run a R script in a standard (i.e. vanilla) environment and with minimal output (i.e. slave). Add these two Options inputs to the "Run R Script" and rerun your workflow.
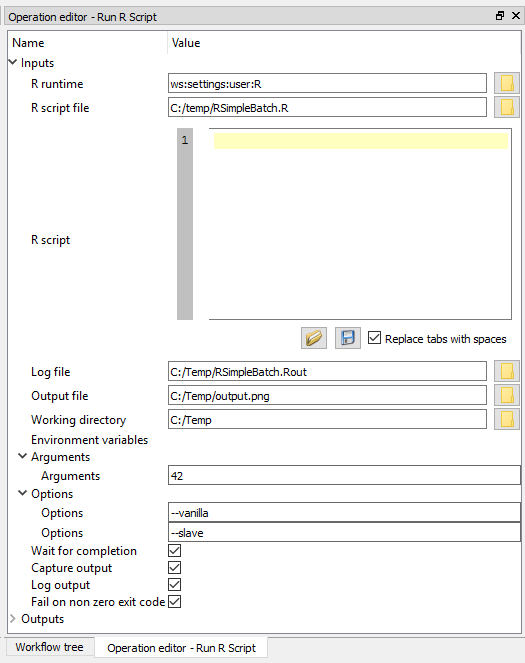
Adding two options to control your R runtime execution
The –slave option will significantly reduce your Script output even if nothing else happens to change with your workflow.
Entering R Script Dynamically
This could almost be left as an exercise for the reader, however before we finish this introductory tutorial we will switch from using an R Script on disk to enter R script dynamically into the "R script" input on the Run R Script operation. Simply do these few steps:
- Remove the fileanme from the "R script file" input (you can also clear the Output file input too - just to see what happens but this has no significant effect on the execution of the script).
- Set the second Argument input back to 42
- Paste the code from inside the file into the "R script" input.
- Rerun your workflow
Your screen should like something like this:
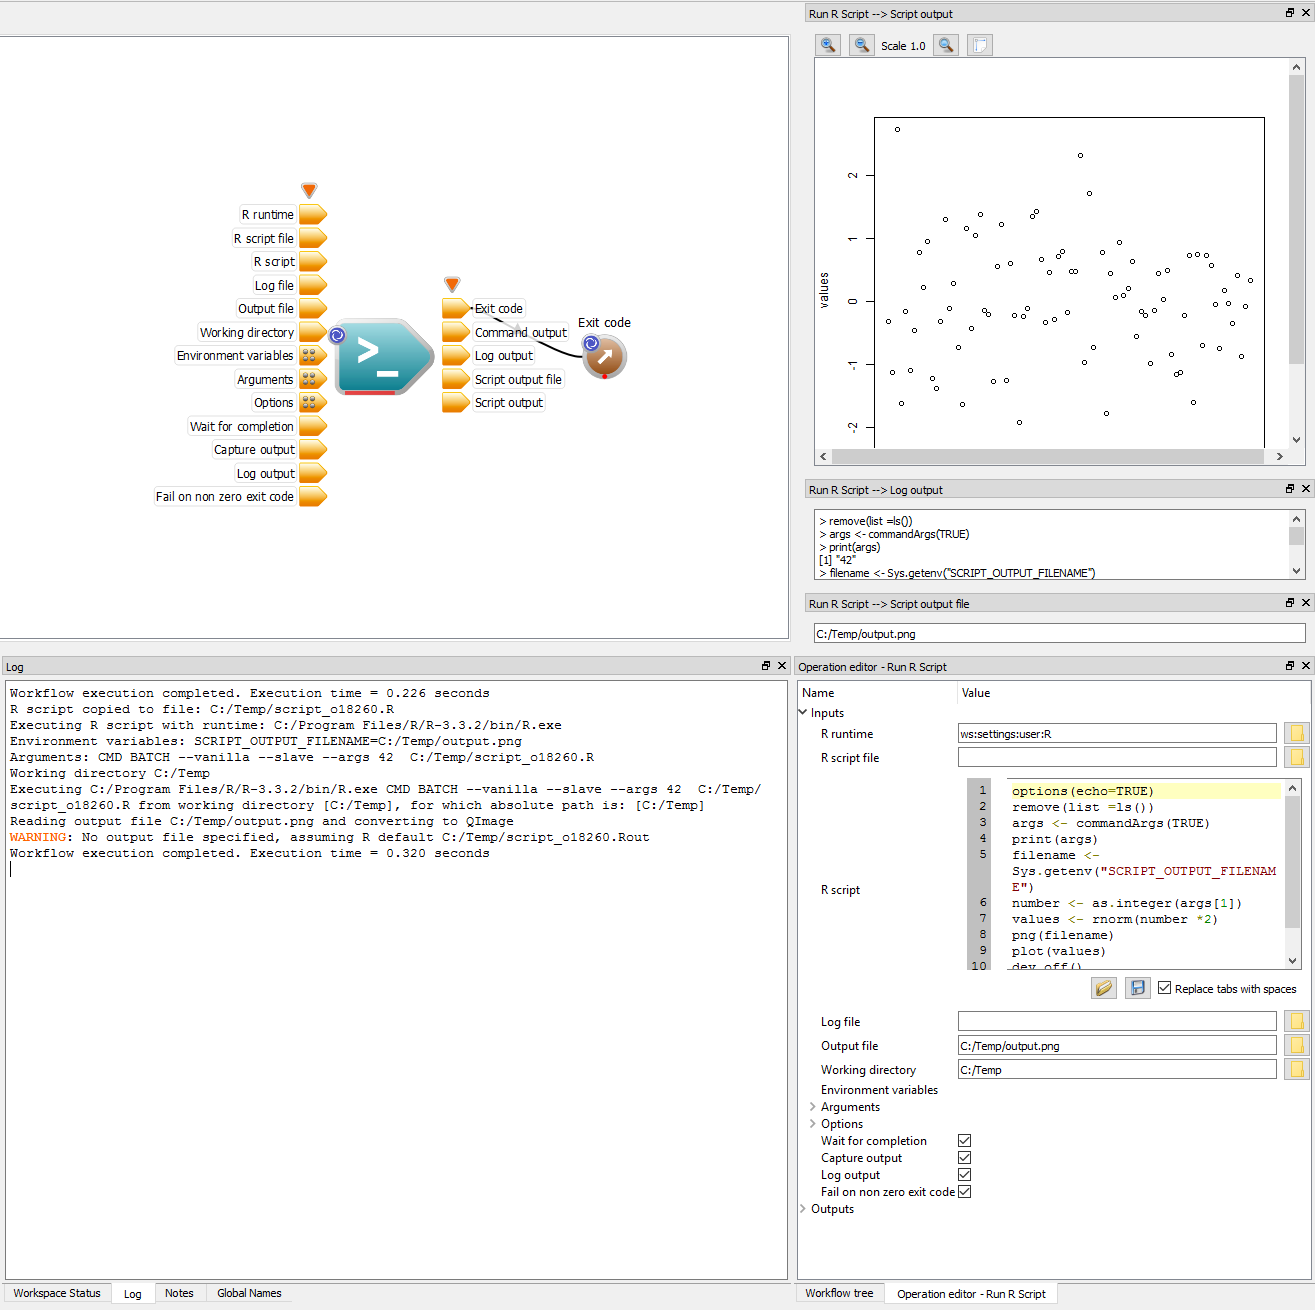
Executing dynamically entered R Script
A couple of items to note:
- The script is written to a temporary file (look in the Log window to see where)
- You get a warning saying that Workspace will assume the location of the R script output file
Finally, one last task to see one advantage of dynamically entering R script, modify a line the script and rerun the workflow. For example change:
values <- rnorm(number)
to:
values <- rnorm(number * 2)
And you can immediately notice the difference in the image.
Summary
Although a somewhat brief tutorial, this tutorial does demonstrate the power of the R Programming Language and how it can be leveraged relativity easily from within your Workspace workflows to perform a wide range of statistical analysis and graphics. In summary in this tutorial we have seen how to:
- Add a "Run R Script" Operation to our workflow
- Configure a "Run R Script" operation
- Pass arguments (and environment variables) to our "Run R Script" Operation
- See the output produced by the R Batch runtime (the .Rout file)
- Access the output of our R script operation
- Set some of the standard execution options