|
Workspace 7.1.0
|
|
Workspace 7.1.0
|
Here are a few Tips and Tricks for Workspace Plugin development.
You can provide a number of command line arguments whenever you start Workspace. The simplest way to see the current list of options is to start Workspace like this:
workspace-batch.exe --help
This will cause the command line options to be listed to the console:
--helpShow help summary
--versionShow version information
--no-pluginsDon't load plug-ins
--no-user-pluginsOnly load the default plugins that ship with Workspace
--no-settingsDon't load user settings
--no-rendering-pluginDon't load the rendering plugin
--config [filename]Specify configuration filename
--globalName [globalName] [value]Specify an initial value for a global name in batch mode
--input [inputName] [value]Specify an initial value for a top level workspace input in batch mode
--maxThreads [maxThreads]Specify the maximum number of local threads to use
--runAsServer [runAsServer]Presence of this switch indicates the batch utility should execute in server mode
--saveOnExit [saveOnExit]Specify whether to save the workspace to file post exit
The command line options --no-plugins and --no-user-plugins can be useful during plugin development where you may inadvertently create a faulty plugin that fails at load time and therefore prevents Workspace from successfully starting. See the section Specifying the Location of plugins for more details on the various mechanisms that allow you to specify which plugins to load at start-up and the process to follow to remove a faulty plugin from the Workspace start-up sequence.
At its core, the plugin loading sequence is rather straightforward, it merely involves Workspace searching through a number of supplied paths looking for Workspace plugins and then Workspace attempts to load any plugins it finds. Plugins are platform specific libraries (so a DLL on Windows for example) and Workspace plugins additionally contain a couple of well-known entry-points that serve to inform Workspace that a platform specific library is actually a Workspace plugin - as well as some other information such as which version of Workspace a plugin was compiled against. Workspace will not load incompatible plugins; for example plugins compiled against a different Major-Minor version of Workspace will not be loaded.
There are three ways to specify the location of Workspace plugins so Workspace will attempt to load them at start-up.
Remember, essentially all of these methods just supplied a list of paths for Workspace to search through. There are three different methods as they all accomplish their task using three slightly different mechanisms. If you create an installAreas file in the Workspace installation directory (option 1), then these settings will be applied whenever anyone starts this specific version of Workspace - but not any other version of Workspace. Since the file needs to be created alongside the application installation, you will normally need administrator privileges to create the file - and this can be an issue for a normal user. Developers often use this mechanism when they deploy Workspace plugins to end users - possibly using an installer. The installer will normally be running as an Administrator/elevated so it can write to the installation directories and this method ensures that the plugin loads with the correct version(s) of Workspace for all users. "installAreas" files are just plain text files. They would be located within a Workspace installation, for example at:
C:\Program Files\csiro.au\workspace\installAreas
You can have multiple "installAreas" files at this location, for example one for each of a number of plugins. And an "installAreas" file can contain multiple paths, one on each line. You may need more than one path/line in an "installAreas" file to add the locations of other libraries that this plugin depends on.
When you nominate a plugin to load via the Workspace editor (option 2), this setting will be saved in a settings file beneath the user's home directory, so this is how you specify a plugin to be loaded on a per user basis. Using this method means that any time this specific user starts any version of Workspace then this setting will be applied. The limitations with this mechanism are that 1) no other user can use this specific file/settings and 2) there is no way to differentiate between different versions of Workspace that may be installed on this machine. Developers, or users for that matter, can often have multiple versions of Workspace installed on a single machine.
You can set an environment variables (option 3) called WORKSPACE_INSTALL_AREAS. A user can always set a user environment variable or an administrator can set a system value. This mechanism does not allow you to set values on a specific Workspace version however (although we have seen batch files were users modify this environment variables before calling a specific version of Workspace).
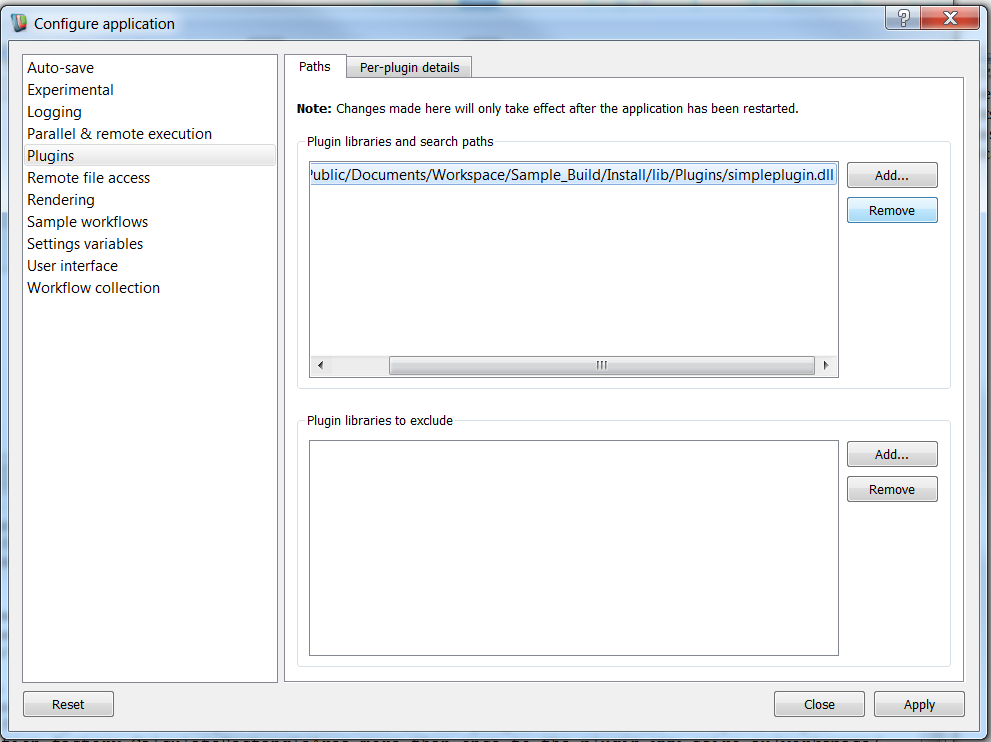
If you specify the loading of a faulty plugin via the "Settings" -> "Application configuration" -> "Plugins" Dialog then you can use the --no-plugins and --no-user-plugins command line options to successfully launch Workspace with no (user-)plugins and then you can remove the faulty plugin from the list in the Plugins dialog. (You could also directly edit the Workspace settings files but there are other settings in this file - so it is simpler to use the Workspace editor.) If you use the installAreas method to specify the location of a faulty plugin then you will need to remove/rename the file. You can either remove the file manually or use the Workspace Plugin Connector application - see The Workspace Plugin Connector for more details. If you are using the environment variables called WORKSPACE_INSTALL_AREAS, then remove the specific path from the variable.
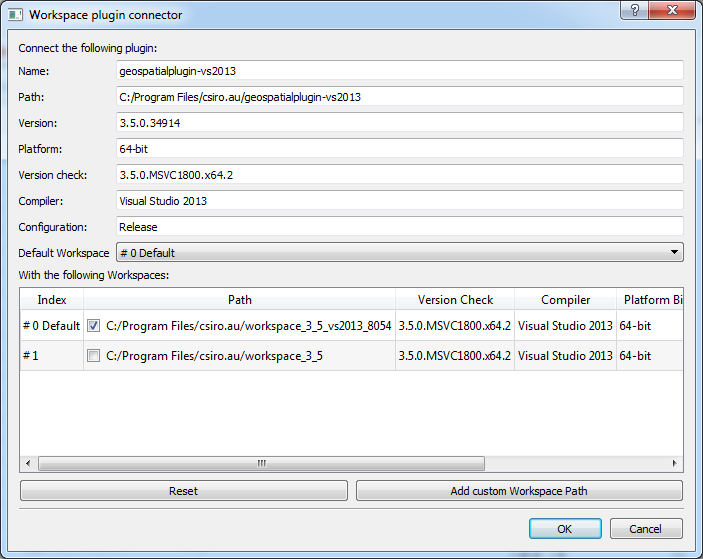
While we are on the subject of installAreas files we should mention the Workspace Plugin Connector. This application ships with Workspace, although many users will never have to use it. The one time you may see it is if you have multiple versions of Workspace installed on a machine and then install a Workspace plugin, in which case the Workspace Plugin Connector may be activated. This is so you can select which version(s) should load the plugin - behind the scenes the Workspace Plugin Connector will write all the installAreas files that are needed to enable your selections. As most users often only have one version of Workspace installed on a machine, they will not see the connector - developers, on the other hand, are more likely to see the Workspace Plugin Connector.
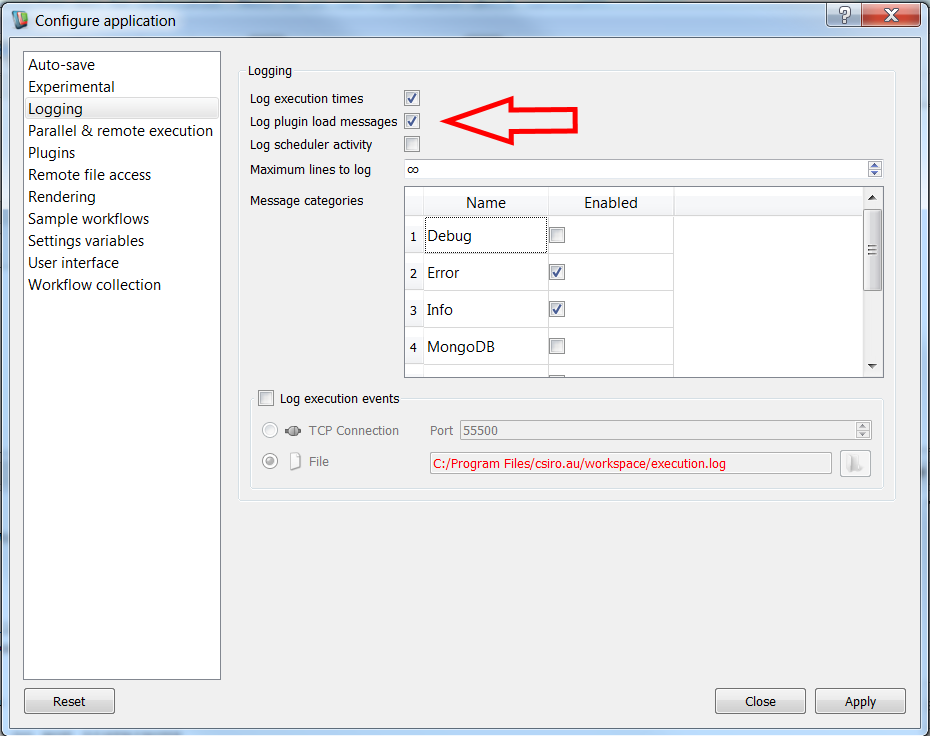
The Configure Application Dialog has a couple of useful options to help with logging in general - and one that helps with plugin load issues:
| Setting | Description |
|---|---|
| Log plugin load messages | Useful to see the reasons why or which Plugin is or is not being loaded. |
You can find it here:
You can start Workspace Help as a separate standalone application. One advantage of doing this is that when completing the Developer tutorials you may need to restart Workspace to load/unload plugins and this way you can keep the Help page open where you are working. Additionally, a modal dialog blocks switching between Workspace and the Help viewer when they are not running as separate processes.
There are a number of supplementary applications supplied as part of the Workspace toolbox. These can be found in the bin directory of your workspace installation. workspace-analyse is a gui-based application and workspace-analyse-batch is a command line; the others can be be run as either a console or a GUI-based application. They include the following:
This gives a simple report on the information and validity of a workflow file
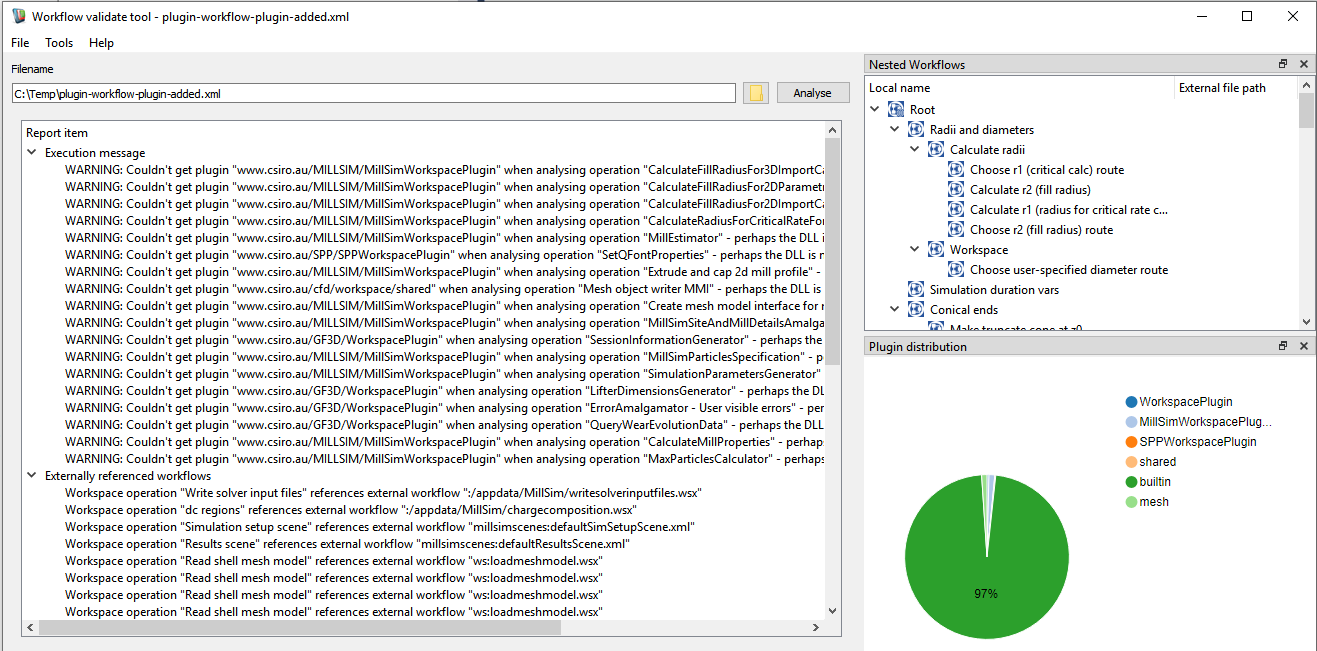
For more information, see Workflow analysis
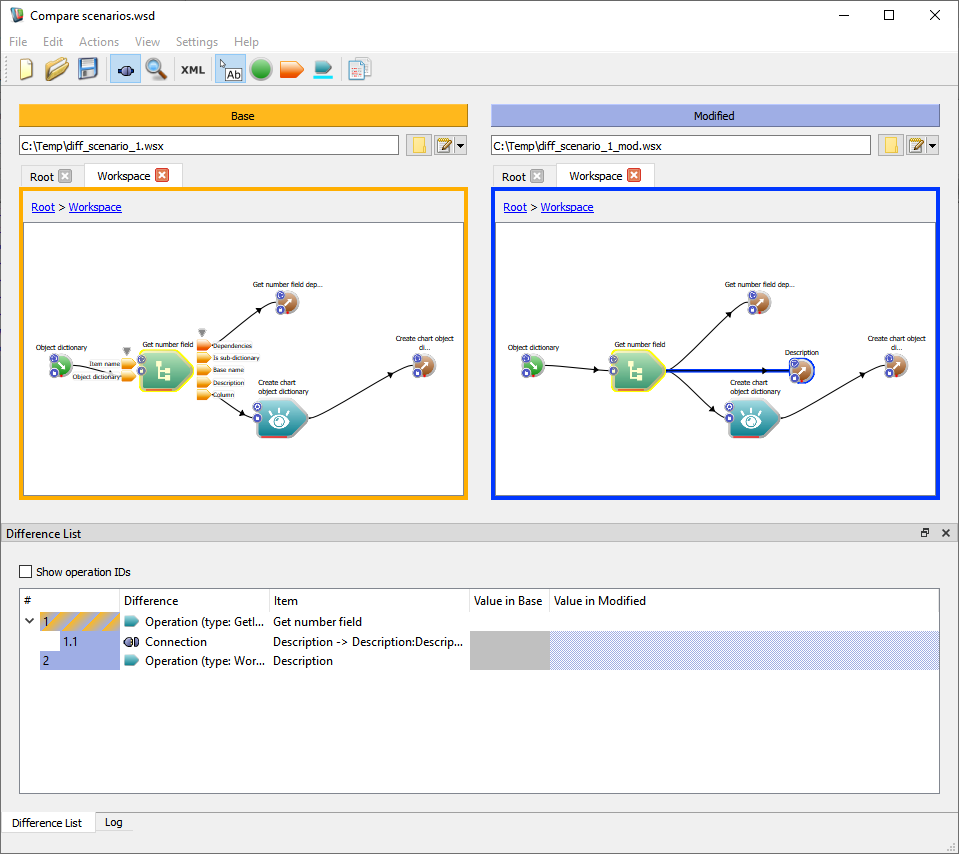
For more information, see Workflow comparison
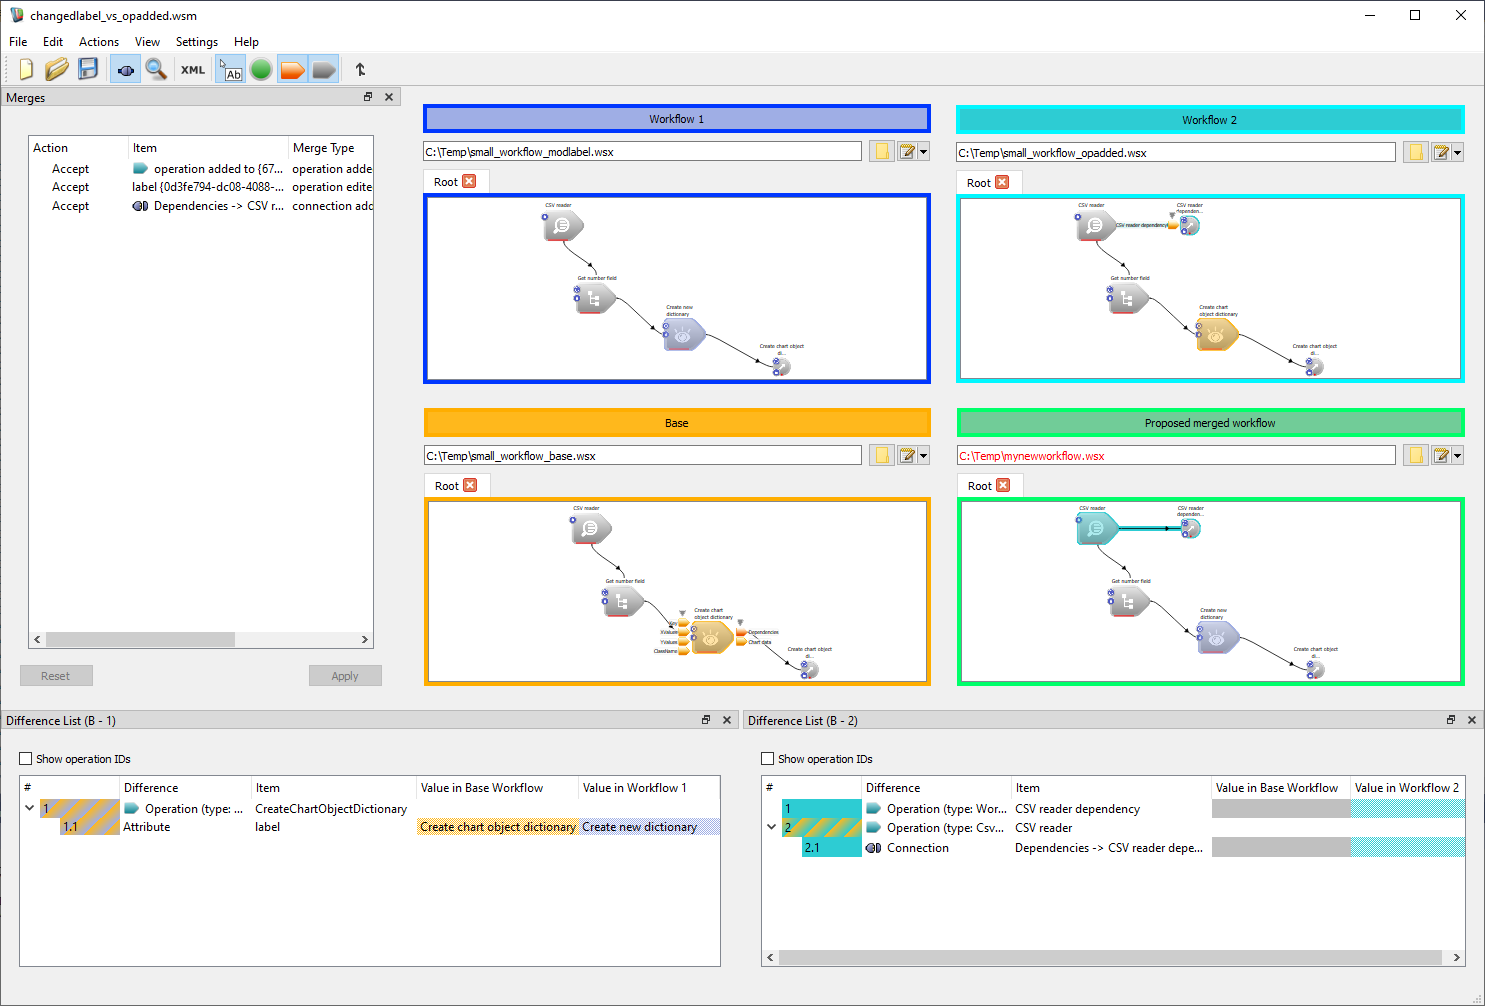
For more information, see Workflow merge
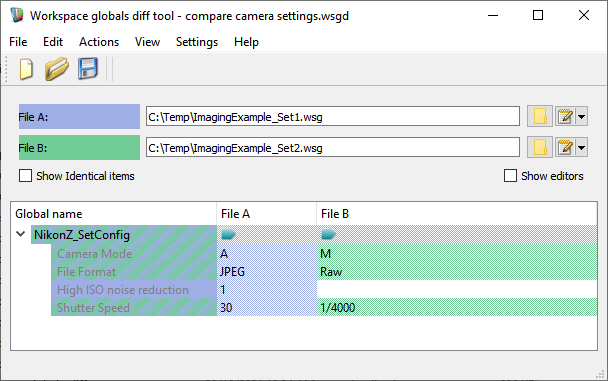
For more information, see Workflow global name comparison
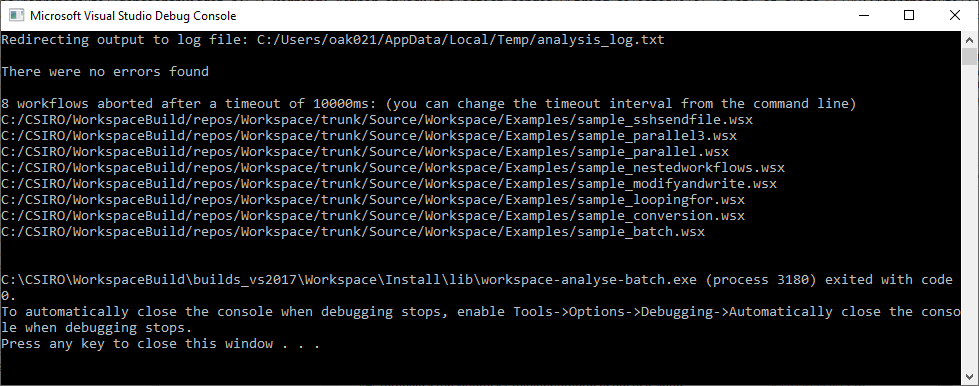
workspace-analyse-batch is a console command that looks for overt problems in loading or running workflows. Use this to check for warnings or errors generated when the workflow is run as-is. By default, it swallows most the of the log contents and sends a summarised display of the generated log output to the console output. Optionally, you can specify a log file and then all log messages generated will be saved there. A sample console output is shown below.
For more information, see Workflow validation
The following tutorials are suggested as next steps: