|
Workspace 7.1.0
|
|
Workspace 7.1.0
|
When interacting with a workflow, users frequently find themselves selecting an operation and looking at its inputs and outputs in the Operation Editor. By default, the Operation Editor will show a simple tree of the inputs and outputs with widgets for viewing/modifying the values held by those inputs or outputs it knows how to represent. An example is shown in the following image:

Behind the scenes, Workspace maintains information for every data type it supports, including a list of widgets that support each data type. Whenever there is a situation where a particular data type needs to be shown to the user, Workspace creates the appropriate widget and connects it to the data.
While the Operation Editor is useful for quickly seeing the inputs and outputs of a single given operation, sometimes it is desirable to have a particular input or output remain viewable/editable while looking at other operations. This can be achieved by opening a display widget for each input or output of interest. These are simply widgets contained in their own window which the user can freely resize and move around their desktop like any other window. Opening a display widget is as easy as right-clicking on the desired input or output in the Workspace Hierarchy view and selecting the desired type of widget from the context menu.
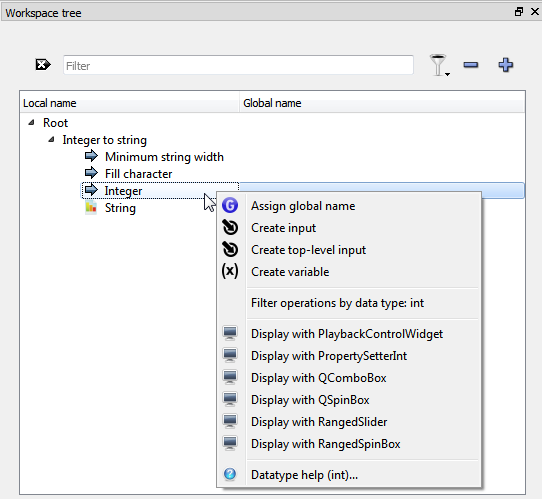
You can also simply right click on the input or output and select a display widget too:
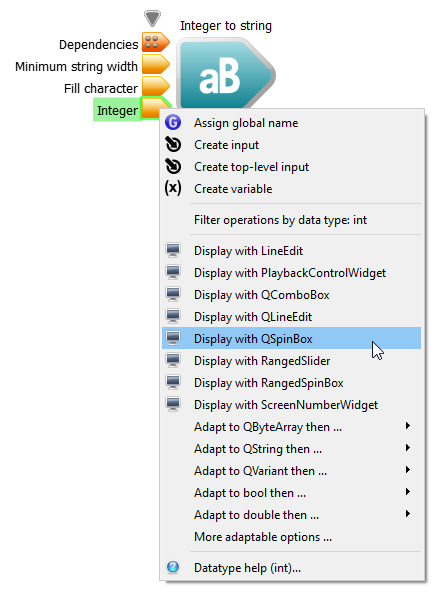
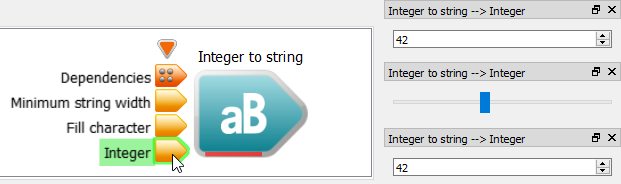
In the above examples, there are multiple different types of widgets that support the data type of the selected input. You can simultaneously open multiple display widgets on a single input or output at the same time.

Display widgets are great for monitoring a small number of inputs and outputs. They are quick to open, they are easy to re-arrange on the desktop and information about them is saved along with the rest of the workflow. Sometimes, however, you want something more and this is where externally defined user interface (.ui) files are useful. A .ui file is a standard format in the Qt toolkit for defining user interfaces, and Qt provides an excellent graphical UI editing application called Qt Designer for working with .ui files. Qt Designer supports the creation of layouts, containers, toolbars, menus, actions and various user interface elements in an easy to use visual manner. Widgets can be made to respond to changes in other widgets and a richer, more dynamic and complete UI can be created. Comprehensive documentation for Qt Designer can be found at http://qt-project.org/doc/qt-5/qtdesigner-manual.html including a quick start guide for those in a hurry.
The Qt Designer application is included in the Workspace package for convenience. Qt Designer should be launched from the Workspace's Development menu, since doing so ensures that certain environment variables are set which enable integration between Qt Designer and Workspace.

One of the more significant features this enables is a mechanism for connecting a UI defined by a .ui file to inputs and outputs in a workflow.
In the same way that display widgets are associated with a particular input or output, individual widgets within a UI created from a .ui file can also be associated with specific inputs and outputs. With display widgets, the association is easy because the widget is created from a context menu on the input/output in question. There is a direct one-to-one relationship between the widget and the input/output. A .ui file, on the other hand, provides not just one widget, but rather a coherent layout containing possibly many widgets. Thus, an alternative approach is used to make the association between widgets and inputs/outputs. This approach uses the concept of global names.
An input or output can be given a global name which is assumed to be unique among all inputs and outputs in the entire workflow hierarchy. The purpose of a global name is to allow a particular input or output to be identified without having to know where it is in the workflow, or even which operation it belongs to. To set a global name for an input or output, right-click it the operation and choose the "Assign global name" entry from the context menu. The dialog will not allow you to specify a global name that already exists somewhere else in the workflow.


You can look in the Global name table to see all the current Global names:

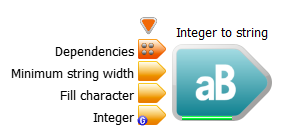
You can also see that an input or output has Global Name by a small G overlaid on the input or output:
An operation can also have a global name. Currently, this global name only has to be unique among global names for other operations, but a future version may require uniqueness among global names for inputs and outputs as well. The main use for a global name on an operation is to handle the special case where a progress bar widget in a .ui file should be attached to the progress of that operation. This is a more advanced feature which will not be discussed further in this tutorial.
Once an input or output has a global name, it becomes possible to associate it with widgets defined in a .ui file. The association is made by adding a custom property to the widget in Qt Designer so that when the Workspace loads the .ui file, it will recognise the property, find the named input/output and establish the connection between it and the widget. By far the easiest way to set these custom widget properties is to make use of the Qt Designer integration that comes with the Workspace. Using drag and drop, it is possible to link an input or output with a widget very quickly. First, in Qt Designer, select the widget that you want to assign the global name to. Then, in the Workspace editor click on the name of the input or output (which must have a global name set) and, holding the mouse button down, drag across to the Property Editor of Qt Designer and release the mouse button. Let us take a look at a simple example, as shown in the following screenshot.

In the above example, firstly you would select the widget in Qt Designer that you wish to make the connection to, in this example it is the QSpinBox object called spinBox. You can select the widget on the design canvas (as shown below by the highlighted blue grab-points on the widget.) You could also
select the widget in the Object Inspector window. No matter which method you use, selecting the widget will cause its properties to be displayed in the Property Editor in Qt Designer. Next you would click on the input named "Integer" in the Workspace workflow and drag the mouse over to Qt Designer and release the mouse button over the Property Editor. As you move the cursor over the Property Editor, the cursor will change indicating when it is possible to release the mouse and make a connection. Releasing the mouse over the Property Editor will present the context menu shown above. By selecting Global name: Value, the association between the input and the widget is established. The result of this action can be seen in the image below where the wsDataPath dynamic property has been set to hold the string globalName:Value. This is how the association is recorded against the widget in Qt Designer and it will be saved as part of the .ui file.

The link between the input in Workspace and the widget in Qt Designer does not
continue to update the widget if the global name on the input is later changed. You need to drag-and-drop the input on the widget name again to update the wsDataPath property. If you want to remove the association, simply delete the wsDataPath property from the widget in Qt Designer (select the wsDataPath property and then click the red minus icon near the top of the Property Editor).
The other option that appears in the menu when using drag and drop between Workspace and Qt Designer has a slightly different purpose (the Local operation input: Integer entry). The section User Interfaces for Operations further below explains what that can be used for.
Once a UI has been created in Qt Designer, global names created for the relevant inputs/outputs and associations made between them and the widgets in the UI, the .ui file is ready to be used in Workspace. A .ui file can be loaded from the File menu with the "Open .ui file..." entry or from the toolbar with the following icon:

Once you open the UI file, your workflow will look something like the following. Also note that as you increment the value of Integer in either the Operation Editor or the UI file widget that the value is immediately updated in both widgets.

Note that you can continue making changes and saving them in Qt Designer and then load the .ui file again without having to restart Workspace. Each time you open the .ui file, a new widget is created but any older version is retained, so you can even make comparisons between different versions while working on them to see if they behave in the intended way.
Unlike display widgets, when a .ui file is loaded, no information about it is saved in the workflow. This is because the .ui file is defined by an external file whereas display widgets use only information the workflow holds internally. If the workflow was loaded on a different machine, display widgets could still be loaded and restored whereas a .ui file could not. For users who frequently re-use the same .ui file(s), the "Open recent .ui file..." entry in the File menu of the Workspace is likely to be useful.
As a final note for developers, .ui files constructed in this way are frequently used as the basis of standalone applications. This will be covered in the Developer Tutorials.
So far, two methods have been discussed for creating user interfaces or widgets in Workspace. One method is to right-click on an input or output and select an appropriate widget from the context menu, resulting in a floating widget tied to that single input or output. The second method is to load a .ui file from the File menu or toolbar to load an all-in-one user interface. You could think of a UI file as potentially providing a single interface to an entire workflow, and indeed they often do. The .ui file approach is much more powerful and allows widgets to be fine tuned both in terms of appearance and behaviour.
The main limitation of .ui files used in this way is that they rely on global names having been set up in the workflow. For one-off UI's and workflows, this is not generally an issue, but there are often occasions where a user may wish to re-use a UI with a variety of workflows or vice versa. In those situations, ensuring global names are set up appropriately can become burdensome.
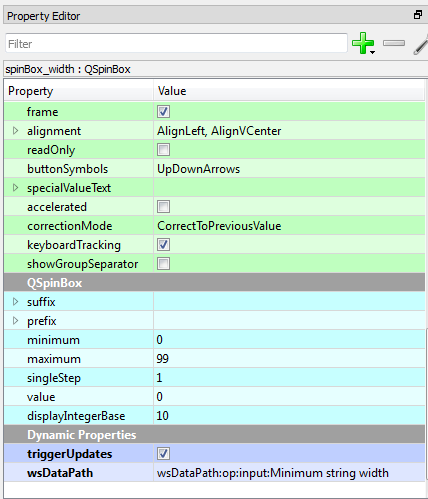
A neat way around this is to create .ui files for use with particular operations. When using drag and drop between the Workspace and Qt Designer, the drop action causes two choices to be presented to the user. Previously, we chose the Global name:... entry to make the association be based on global names. If we instead choose the other Local operation input:... entry, the association is based on the local name of the input (or output, as the case may be). This causes a different sort of value to be saved in the wsDataPath widget property. For the earlier example, the value of this property would instead be wsDataPath:op:input:Integer. The contents of this string don't need to be (and shouldn't be) modified directly by the user, but for the curious this string tells Workspace that the widget uses a data path that is relative to an operation and that the widget should be connected to the "Integer" input of that operation. Below is an example using the Minimum string width input:
If a .ui file is saved with local associations like those just described, they can then be loaded by right-clicking on an operation and selecting the "Open .ui file for operation..." from the context menu. It is the user's responsibility to ensure that the .ui file makes sense for that particular operation, but Workspace will report any cases where a widget has an invalid wsDataPath.
In some cases, the author of the plugin from which an operation came might supply a custom .ui file for use with that operation type. When an operation is selected, Workspace checks to see if just such a custom .ui file has been provided and if one is found, it is shown in the Operation editor instead of the generic tree view of inputs and outputs. This custom .ui file would have been constructed in exactly the same way as described just above, being based on local operation input/output names rather than global names. The Blinn Phong Shader operation comes with such a UI file:

When you right-click on an operation that has a custom .ui file available, the context menu will have an additional entry labelled "Open custom display for operation". This entry can be used to create your own floating instance of that same custom .ui-based widget as would be shown in the Operation editor. You would still be free to load your own .ui file if you prefer, or even to load both if you so wished.
