Introduction
Workspace can be used to make use of other remote machine resources that reside outside of a cluster. In this section we will cover:
- How to configure and start a workspace-server
- How to connect a workspace client to a running workspace server
Contents
How to configure and start a workspace-server
Workspace has a remotely installable service called the 'workspace-server' that, when installed on a machine, enables a workspace client to distribute workflows to that machine for execution. In reality we would install the workspace-server onto a number of remote machines we want to use to help process our workflows, to simplify the tutorial however we will install the workspace-server onto our local machine.
- Workspace comes with an administration utility (called the 'Workspace server admin' utility) to help you configure, start and stop a workspace server. As mentioned, normally you would additionally install the workspace package onto a remote machine so as to be able to start the workspace server remotely however as mentioned, to simplify the tutorial we will perform this client server test on a single machine. Let's launch the Workspace server admin utility from our start menu. IMPORTANT - You MUST launch the Workspace server admin utility using the same user account configured to launch the Workspace server service. Failure to do so will result in your configuration changes not being visible to the Workspace server service.
- Once launched you will be presented with the workspace server admin graphical user interface that looks as follows:
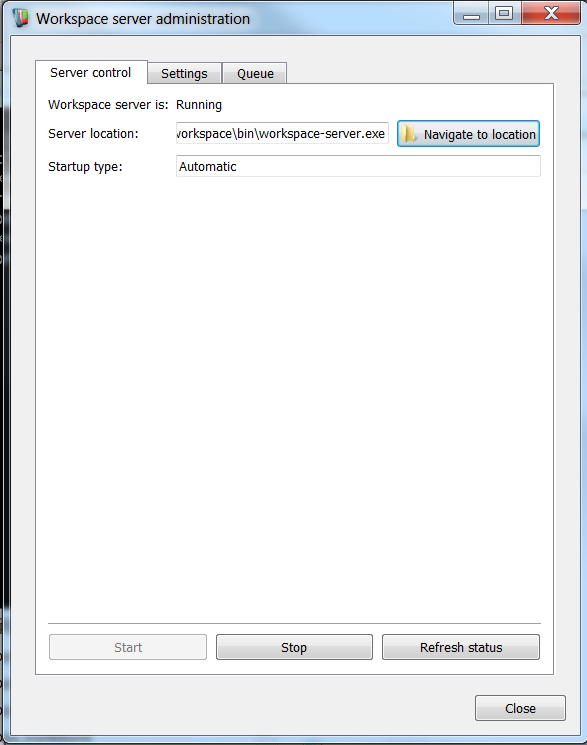
Workspace server admin graphical user interface
- Before a client can connect to our workspace server we must configure the security settings. To do this, navigate to the tab entitled "Authentication".
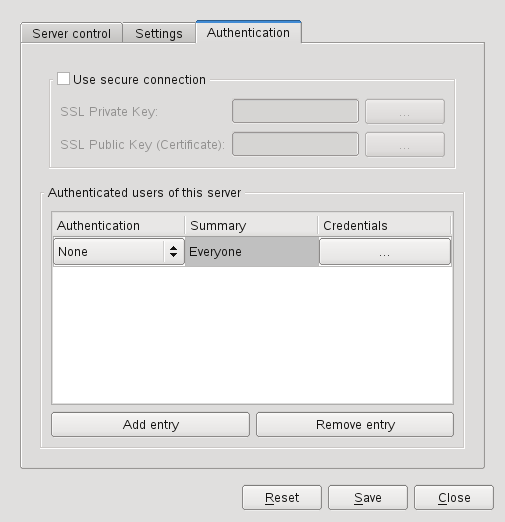
Configuring authentication
- Click the "Add entry" button to add an authentication entry.
- In the newly added row, ensure the first column "Authentication" is set to "None". This will grant any user access to the server.
- Click the Save button to apply your changes.
- To start the workspace server simply click the "Start" button on the "Server control" tab (NB. you may need to run this application under an administrator account in order to be able to start the workspace-server service).
- By default, on starting the service, the service will bind itself to port 42150. You can change the default port in the "Settings" tab.
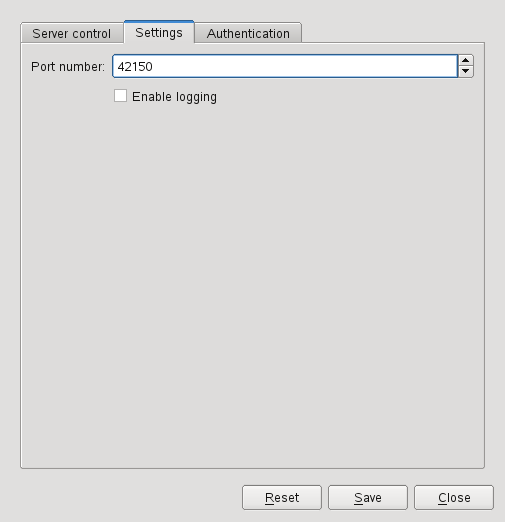
The settings tab
- You should now have a running workspace-server, the next thing to do is to configure a workspace client to connect to our workspace-server.
How to connect a workspace client to a running workspace server
In the previous section we started a workspace-server on our local machine using the workspace server admin utility, in this section we will configure our workspace editor to be able to connect to this workspace-server.
- Open the workspace editor
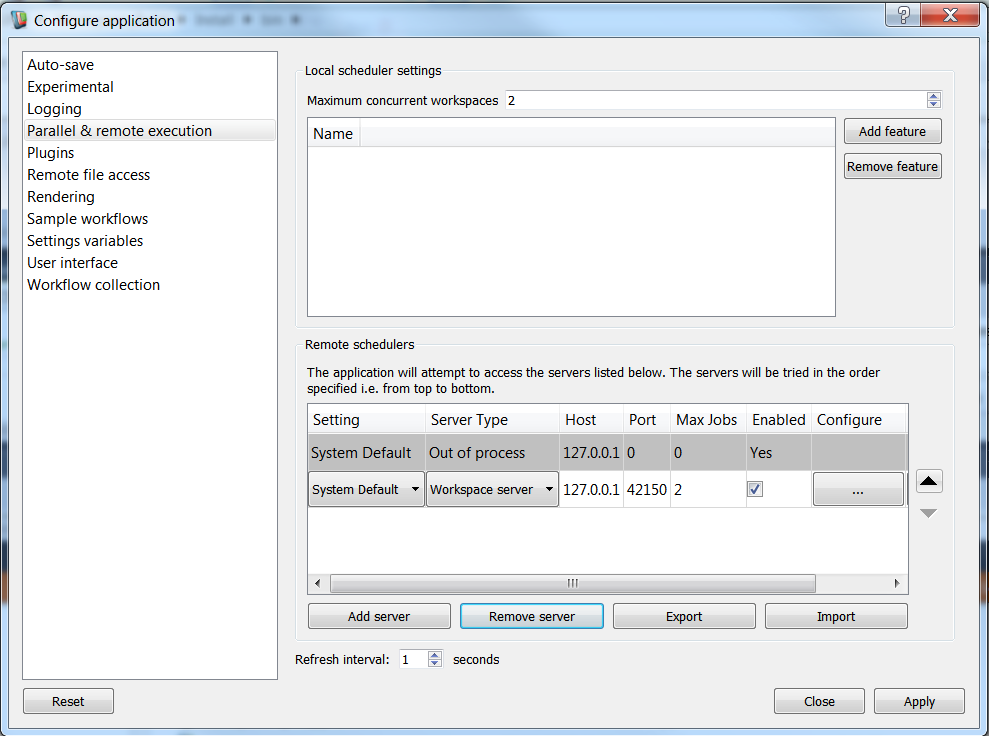
- Go to Settings / Configure application... menu and select the "Parallel / Remote execution" settings entry from the left hand list
- You should have two default servers in your servers list: one default Out of process server as well as a default Workspace server, remove any other servers from your list
Configuring workspace editor client settings
- We are now going to register our local workspace server so click the "Add server" button
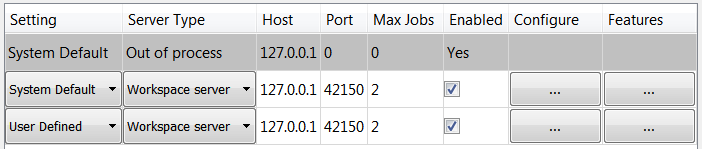
New workspace server is added with default settings
- Set the Server Type to "Workspace Server"
- Set the Host to "127.0.0.1"
- Set the Port to 42150 (or the port that the workspace server above was configured to run on if you changed this)
- Set the Max Jobs to 2
- Set the Enabled field to ticked
- Next, click on the Configure... button and set the authentication provider to "none" and click OK
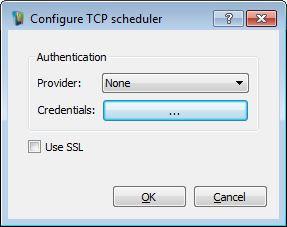
The TCP scheduler specific configuration dialog
- Click 'Apply' then 'Close'
- For your settings to be applied restart the workspace editor
- Next, open the sample workflow.
- This workflow will generate many images in parallel. As an image can potentially be generated on one of several machines (depending on how we have configured our workspace-server i.e. running locally, remotely on a single machine or remotely on multiple machines) we would like to see the name of the executing machine in the image file name along with the iteration number. The workflow, as mentioned, will generate many images in parallel with the following naming convention:
{DATADIR}/{iteration#}_{HOST}.png
- DATADIR will be an environment variable configured on all our executing machines to point to the generated image output directory. Create this environment variable now as per your OS documentation. This environment variable should hold the full absolute path of the directory into which you would like the workflow to generate images.
- HOST will be an environment variable configured on all our executing machines to hold an executing machine's host name. Again, create this now as per your OS documentation. This environment variable should hold the name of your machine.
- In order for your environment variables to be detected by the workflow you will need to restart the workspace editor.
- Similarly, you will need to re-launch your workspace-server administration utility and restart your workspace-server.
- With your environment variables in place, your workspace-server and workspace editor restarted you can now run the workflow. This workflow will generate a set of blank images with the title of each image being the host name and iteration number combined into the directory specified by the DATADIR environment variable you created above.
- On workflow completion, check the contents of the DATADIR directory and confirm that it contains a complete set of images i.e. one per iteration.
- You can repeat this tutorial running a workspace-server on an arbitrary number of Windows, Linux and / or Macintosh machines. Ensure that you have each workspace-server machine registered with your workspace editor as desrcibed above and you have configured your data directory and host name environment variables on each machine.
As mentioned, the workspace server can be installed onto any number of remote machines however in this demonstration we ran both the workspace client and server on a single machine. Additionally, access to the workspace server can be restricted to an explicit set of users and communication between workspace client and server can be further secured over an SSL connection. To configure SSL simply register your SSL private and public keys with the workspace server and modify your workspace editor's server entry providing the public key.
Summary
This concludes the tutorial on making use of remote compute resources using the workspace server.