|
Workspace 7.1.0
|
|
Workspace 7.1.0
|
Workspace can be many things to many people, but at its most basic, it can be thought of as a way to easily combine various operations (eg tasks, computations, steps in a sequence) with the ability to pass information between them via connections. These are the two most fundamental concepts in Workspace.
An operation represents a task or computation. It uses data passed to it through its inputs and it can provide data or results via its outputs. Operations can do just about anything, from calculating some quantity through to reading or writing files. The main requirement is that they can only use information provided by their inputs.
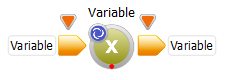
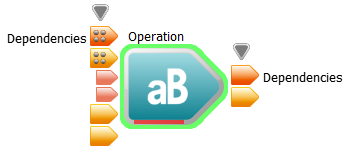
The following illustrates the key parts of an operation:
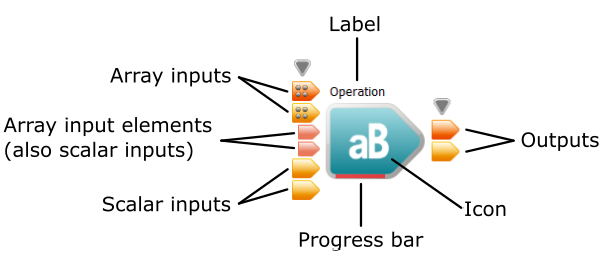
The graphical Workspace editor represents operations as shown in the image above. It uses some visual cues to help the user and it is useful to know what these are. Some aspects can be modified by the user and some by developers providing their own operations through plugins.
Label
Every operation has a modifiable Label associated with it. You can right-click on any operation, select "Properties..." and change this label to whatever you like (even multi-line labels can be used). Choose labels that have clear meanings and that will allow you to identify the operation among all the others you have in your workflow.
Progress Bar
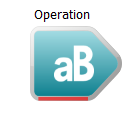
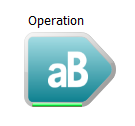
Operations also have a Progress bar along the bottom. This indicates whether the operation is up-to-date or not, or how far it has progressed into its task. The up-to-date state of an operation will be discussed in more detail later, but for now just be aware that a red progress bar indicates that the operation is not up-to-date and a fully green progress bar means the operation is fully up-to-date. Anything else means the operation is currently executing.
Icon
There will also be an Icon shown on each operation. This is just to help you quickly identify operations without having to read their labels. There are a number of different default icons (i.e. for Reading or Writing files). Users are not able to change these icons, but developers can specify different icons for their operations when writing plugins for Workspace.
Each operation will have a set of Inputs and Outputs. Understanding these is fundamental to using Workspace, since they form the means by which users can pass data into and/or out of operations and thereby change the behaviour of operations. Operations can have two kinds of inputs, scalar and array. A scalar input is sometimes simply called an "input" because it is the most basic sort of input. A scalar input is a single input that provides a single piece of data to the operation. An array input, on the other hand, can hold any number of sub-inputs. Each sub-input is actually just a scalar input, so you can think of array inputs as simply holding a set of scalar inputs. It is easy to tell the type of input, that is whether it is scalar or array, based on the image with which it is drawn (see the topmost image above). Array inputs are shown with two rows of dots, these dots are not displayed on scalar inputs. Sub-inputs are shown as smaller arrows which are slightly indented, indicating that they belong to an array input. Sub-inputs are always grouped immediately following the array input they belong to.
An operation can also provide outputs. These are much simpler than inputs because there is only one kind of output, that is there is no such thing as an output array. Each output represents a piece of data that the operation provides for other operations to use as they please. Outputs are also shown with an arrow-like appearance, just like scalar inputs, except the direction of the arrow is out of the operation.
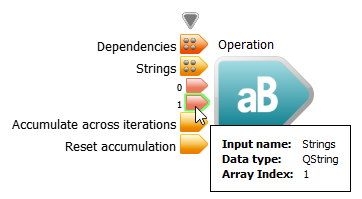
All inputs and outputs have a name and a data type. Names generally contain letters, numbers and/or spaces, while data types are restricted to the set of types Workspace knows about. These cannot generally be changed except for certain types of operations with the ability to customize themselves, which we will ignore for now. You can move the mouse over an input or output and its name and data type will be shown in the status bar at the bottom of the window. Additionally, tooltips will provide the same information after a short delay.
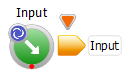
A mini operation is exactly the same as an operation except that it is reduced in size to prevent cluttering the Workspace canvas.
At present, Variable, WorkspaceInput and WorkspaceOutput are represented as mini operations on the canvas.

Connections can be made from an output of one operation to a scalar input of another operation (this includes sub-inputs of an array input). They define a dependency between the source and destination of the connection. The destination operation cannot execute before the source operation can provide the requested data. Connections are created using a "drag and drop" motion, by left-clicking on an output and while holding down the left mouse button down, dragging the mouse over the input you want to connect to and then releasing the left mouse button. While dragging, only inputs that are compatible will be displayed. While dragging and when the mouse is situated over a compatible input, the input will change its background to green. It is also possible to construct the connection by dragging from an input to an output. The Status Bar at the bottom of the window will also show some information about the input the mouse is hovering over during this process:
When you want to make a connection to an array input, there are two approaches you can take:
For the first approach, (i.e. add an input then connect) you have two means to add an array input:
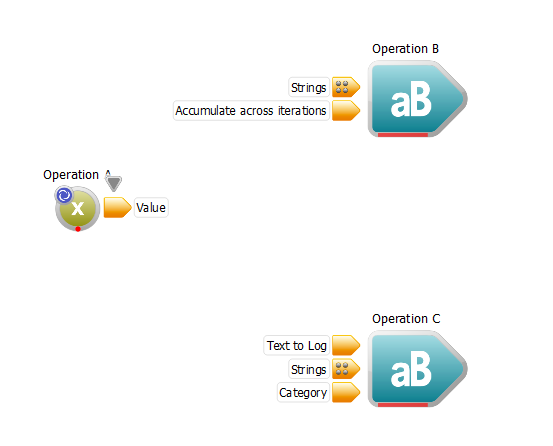
For the second approach, use drag and drop to create a connection like you normally would, releasing the mouse button over the array input. You will then see a new sub-input appended to the input array and the connection will be made to that new sub-input. This process is shown in the image immediately above, that is the Strings input on Operation B is an array input.
After you create a connection, it will look something like the following:

In the above example, the connection provides data from Operation A to Operation B. It also implies a dependency (B depends on A), since B cannot execute until A has executed. A more complicated example might be something like this
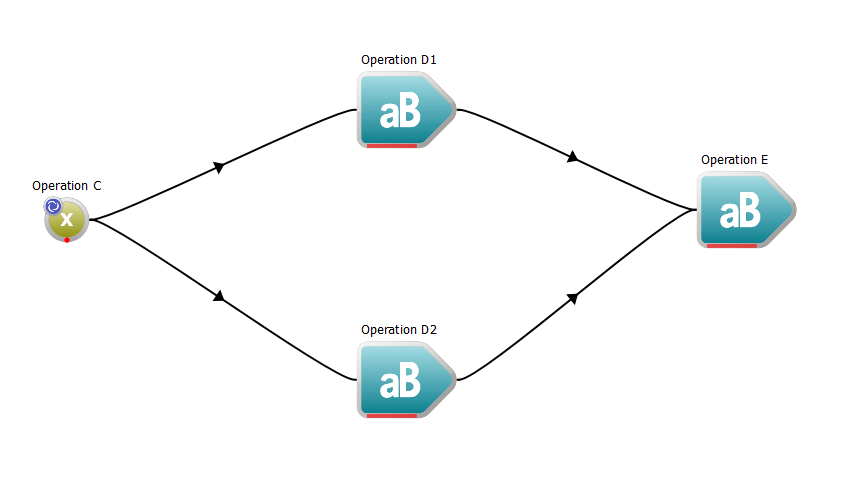
In this example, operation C will have to execute first. Then, operations D1 and D2 will execute, but either of the two could run before the other. After both have been executed, operation E will execute. With regards to D1 and D2, Workspace is allowed to execute these two in whichever order it prefers, since neither depends on the other.
Sometimes, you want to imply a dependency between two operations without actually passing any data between them. To enable this, every operation will have a special input and output dedicated to this purpose. The first input for an operation will always be an input array and it will have the name Dependencies. Likewise, the first output for an operation will always have the name Dependencies as well.
These inputs / outputs carry no data; they exist only to allow the user to make connections between operations to indicate that one operation depends on another, but not in a way that requires data to be passed between the two. A typical example would be where one operation writes a file and another launches a process that will read that file as input. To use our example above, if you wanted to specify that D1 must execute before D2, you could modify the arrangement to the following:
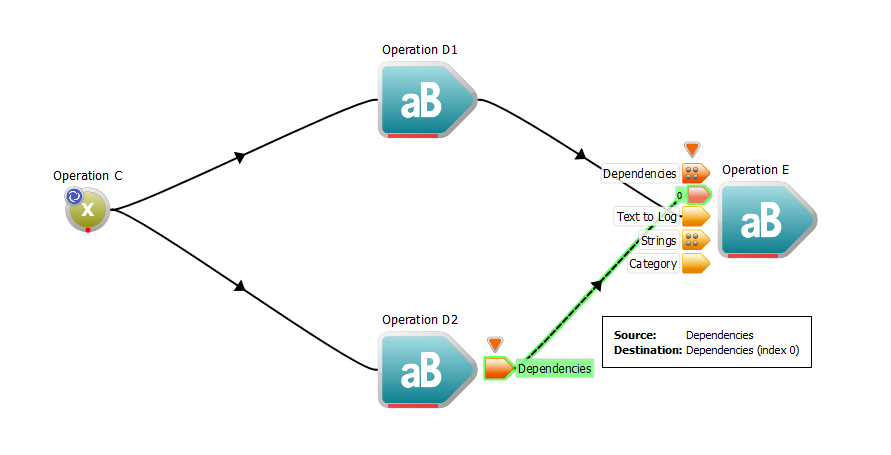
Note how the first output of D1 is connected to a sub-input of the first input array of D2. The order of execution is now fully defined: